

Everybody answers what is overlanding with a $90,000 rig and a drone shot. The useful answer starts with the truck already in your driveway.
You’re eleven miles down a forest road that started out graded and turned into two ruts and a memory. It’s four in the afternoon. The map on your phone stopped updating six miles back, and the last thing it showed was this road continuing for another mile and a half.
It does not continue. It ends at a washout with a berm pushed across it, and the only way out is the way you came in — which now has to be driven in reverse for two hundred yards before there’s anywhere wide enough to turn around.
Nothing is broken. Nobody is hurt. You’re just going to be late, and annoyed with yourself, and somewhere in the third attempt at that three-point turn you’re going to wonder whether you actually knew what you were doing when you left the pavement.
That gap — between wanting to go and knowing how — is the subject of this post. Not the gear. The gap.
What Is Overlanding, Really?
So: what is overlanding? It’s self-reliant vehicle travel where the journey is the point rather than the destination. You drive to remote places on unpaved roads, carry what you need to stay self-sufficient for days, and sleep wherever you end up rather than at a reserved site with a numbered post.
The term is Australian. It originally described droving livestock long distances to new grazing or to market; in 1906 Alfred Canning surveyed a stock route to move cattle roughly 1,500 km across Western Australia. Those routes became roads, and the roads became recreation. Overland Journal’s working definition — self-reliant adventure travel to remote destinations where the journey is the principal goal — is the one most of the industry has settled on.
Three words in that definition do all the work:
- Self-reliant. Your own water, power, shelter, food and recovery capability. Nobody is coming to plug you in.
- Remote. Unpaved, unserviced, usually out of cell coverage. Measured in days, not hours.
- Journey. The driving is the activity. If the dirt road is just an obstacle between you and a lake you wanted to fish, that’s a fine weekend — it just isn’t this.
Strip those away and you’ve got camping with extra steps and a bigger fuel bill.
What Is Overlanding Not? Four Things It Gets Confused With
Read this section before you read any gear list, because it’s the one that saves you money.
It is not rock crawling. Rock crawling is a technical driving sport where the obstacle is the point. Overland routes are mostly graded dirt and forest service roads with the occasional rough section. If you’re building for articulation and 37s, you’re building for a different hobby.
It is not car camping. Car camping means driving to a developed site, parking, and camping next to the vehicle. Pavement or gravel, and a picnic table. Great way to spend a weekend; not this.
It is not vanlife. Vanlife is a housing arrangement. Some vans overland; most are optimized for standing headroom and staying put for a week.
It is not a purchase. This is the expensive misunderstanding. The industry has a strong commercial interest in you believing the answer to what is overlanding is a rooftop tent, a drawer system, a fridge, an awning, a bumper and a winch. It isn’t. It’s a set of decisions about weight, legality, water and getting unstuck.
Why Getting “What Is Overlanding” Right Saves You Money
Because the way you answer it sets the budget. Think you’re buying into rock crawling and you buy suspension and armor. Think it’s vanlife and you buy a build-out. Understand that overlanding is a self-sufficiency problem wearing a driving costume, and you buy water storage, a way to navigate without signal, and recovery gear — for roughly a tenth as much.
It also decides where you’re allowed to go, which is the part almost nobody covers and the part that actually gets people cited.
How to Start Overlanding: The Short Version
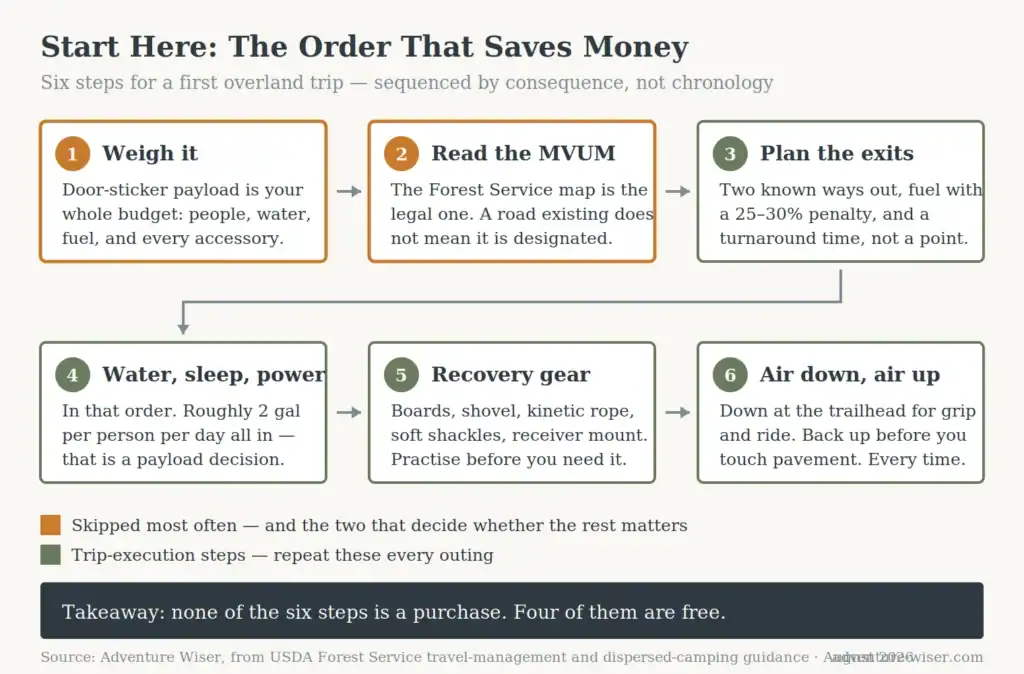
This is where what is overlanding stops being a definition and starts being a Saturday. Six steps, ordered by consequence rather than chronology. The first isn’t chronologically first — it’s first because it determines whether the rest of the list even applies to you.
- Weigh before you buy — find out what your vehicle can legally carry
- Learn the map that governs the roads — the MVUM, not Google Maps
- Plan a route with bail-outs — every leg needs an exit
- Sort water, then sleep, then power — in that order
- Carry recovery gear you’ve practiced with
- Air down at the trailhead, air up before pavement
Here’s how each works in practice.
Step 1 — Do the Payload Math Before You Buy Anything
Open your driver’s door and find the yellow sticker. It gives a combined weight for occupants and cargo. That number — not towing capacity, not what the truck feels like it can carry — is your entire budget for people, gear, water, fuel and every accessory you bolt on.
It goes faster than you’d think. Two adults and a dog is roughly 400 lb. Fifteen gallons of water is 125 lb. A steel bumper is 150 lb. A drawer system is 150 lb. A rooftop tent and rack together can run 200 lb. On a lot of mid-size trucks that’s the whole allowance, before food.
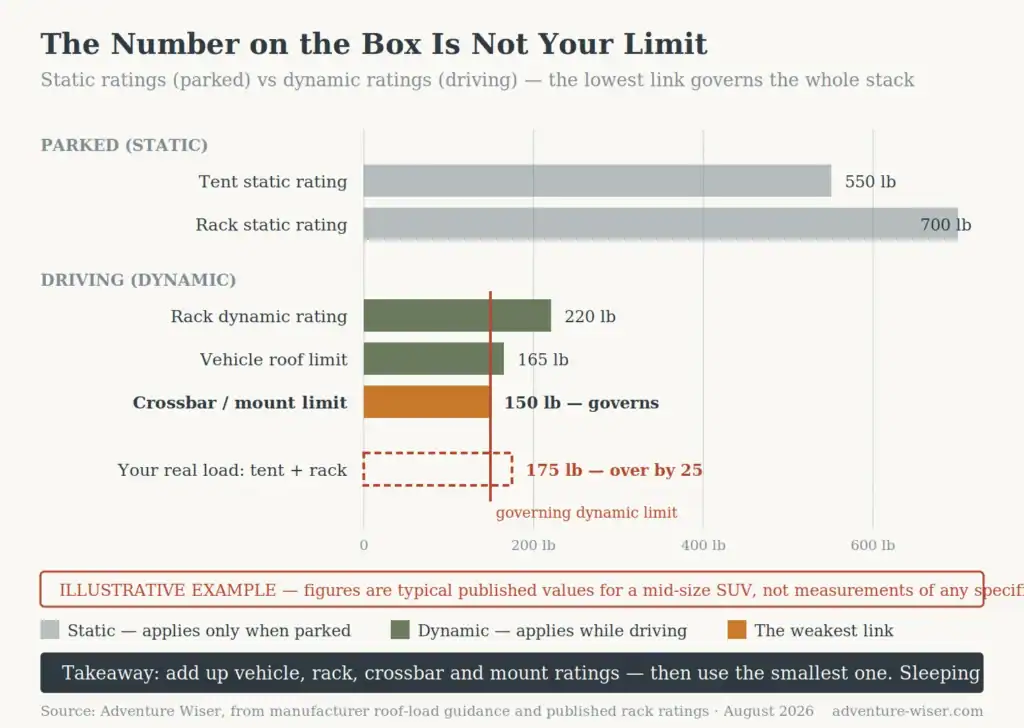
The roof is its own trap, and it’s where people get hurt. Roof loads carry two ratings: dynamic (moving) and static (parked). Static ratings typically run three to six times higher than dynamic ones, which is why a tent advertised as safe for two adults can still be illegal to drive with. The rule that matters: your working dynamic limit is the lowest number in the whole stack — vehicle roof limit, rack rating, crossbar rating, mount rating. If any one component is 150 lb, then 150 lb is your ceiling no matter what the tent’s box says.
Do this on paper before you spend anything. If the numbers don’t work, the honest answer might be a bed rack instead of a roof rack, or a ground tent instead of either. It’s the same payload-first discipline that separates a workable truck camper build from a sagging one.
Step 2 — Learn the Map That Decides Where You Can Legally Drive
This is the biggest gap between people who overland and people who think they do, and it’s the part of what is overlanding that gear reviews never touch.
The Motor Vehicle Use Map is a free Forest Service document showing which roads and trails on a district are legally open to motorized travel, by vehicle class and often by season. It isn’t a suggestion and it isn’t a topo map — it’s the legal instrument. A road existing on the ground, on satellite imagery, or in a mapping app means nothing if it isn’t designated on the MVUM.
It also governs how far off a road you can drive to camp. On many forests, motor vehicle use off a designated road for dispersed camping is permitted up to 300 feet from the road centerline — but that figure is set forest by forest, and some districts cap it at 150. Driving farther than your local map allows to reach a better spot isn’t a gray area; it’s off-route travel, with its own citation separate from anything about camping.
Here’s the fact worth writing down if you run the Ouachitas, because it contradicts the “14 days everywhere” rule the internet repeats. On the Ouachita National Forest you may camp in a dispersed area for up to 30 days; after that you must move at least five road miles to camp in another dispersed area, and you may not return to the same campsite within the calendar year. Campsites must sit at least 100 feet from any stream. Different forest, different numbers — check the district you’re actually in.
The MVUM’s weakness is that it shows legality and nothing else: no contours, no grades, no washouts. Which is why it has to be read next to a real topographic map — the MVUM says a road is open, the topo says whether the truck can climb it. If you’ve never cross-referenced the two, the map and compass fundamentals are the missing half of this skill.
And here’s the one that surprises people: on a forest road with no signage and no signal, the way you keep track of which junction you’re at is by counting mileage between known points. That’s dead reckoning — same technique as on foot, just with an odometer instead of a pace count. It’s the single most useful land-nav skill to bring to a truck.
For carrying all this, onX Offroad bundles the MVUM layer with offline downloads, at $34.99/year for Premium and $99.99/year for Elite (checked August 2026; they discount it regularly). Download before you leave pavement. Carry a paper backup anyway.
Step 3 — Plan a Route With a Bail-Out at Every Stage
Amateur route planning picks a destination. Working route planning picks a destination and then asks, at every leg: if this road is closed, washed out or gated, where do I go instead, and do I have the fuel and daylight to get there?
Three things to write down before you leave, on paper, in the glovebox:
- Fuel range with a real reserve. Assume 25–30% worse economy than your highway number. Loaded, aired down, on climbs, that’s not pessimism.
- A turnaround time, not a turnaround point. Decide what hour you stop pushing forward regardless of how close you are.
- Two known exits off the route, and roughly how long each takes.
Forest roads close. Logging operations, storm damage and seasonal gates are routine, not exceptional — the Ouachita alone had several road and trail closures posted the week I wrote this. Check the district’s alerts and ethics page the day before, not the week before.
Step 4 — Sort Water, Then Sleep, Then Power
The order matters, and most people run it backwards because power is the fun one to shop for.
Water first. A gallon per person per day for drinking and cooking, plus roughly another for washing and cleanup. Three days for two people is about nine gallons — 75 lb. That’s a payload decision, which is why step one came first.
Sleep second. The cheapest working setup is a ground tent you already own. A rooftop tent buys a flat, dry, off-the-dirt platform in about ninety seconds — a real benefit, and the reason they sell — but it costs roof payload, fuel economy, and the ability to leave camp without packing up. Start on the ground. Upgrade once you know what actually annoys you.
Power last, and smaller than you think. For a weekend with no fridge, a decent power bank and a headlamp cover it. Add a 12V compressor fridge and you’re into battery sizing, which is where budgets detonate. If you’re going there, size the system against a real load list instead of buying by the watt-hours on the box — the gap between rated and usable capacity is not small.
Step 5 — Carry Recovery Gear You Have Actually Practiced With
Getting stuck is normal. Getting hurt during a recovery is not, and the difference is almost entirely attachment points and rope choice.
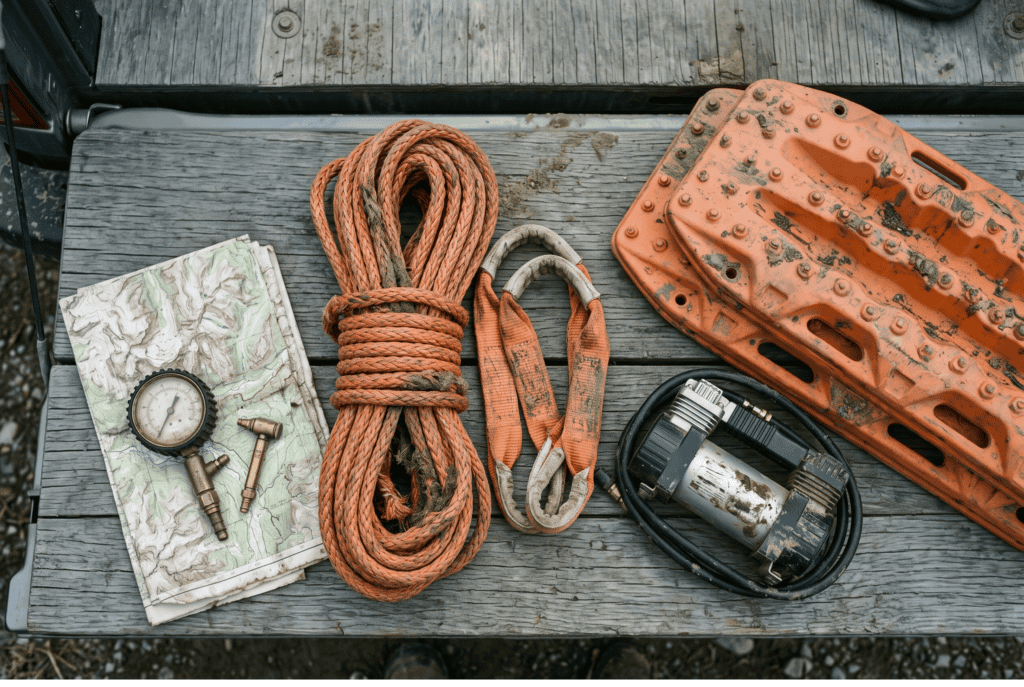
Minimum honest kit for a stock vehicle on forest roads:
- Traction boards — boring, cheap, and they solve most forest-road stucks by themselves
- A shovel — half of all recoveries are just digging
- A kinetic recovery rope rated well above your vehicle weight, plus two soft shackles
- A receiver shackle mount if you’re pulling from a hitch
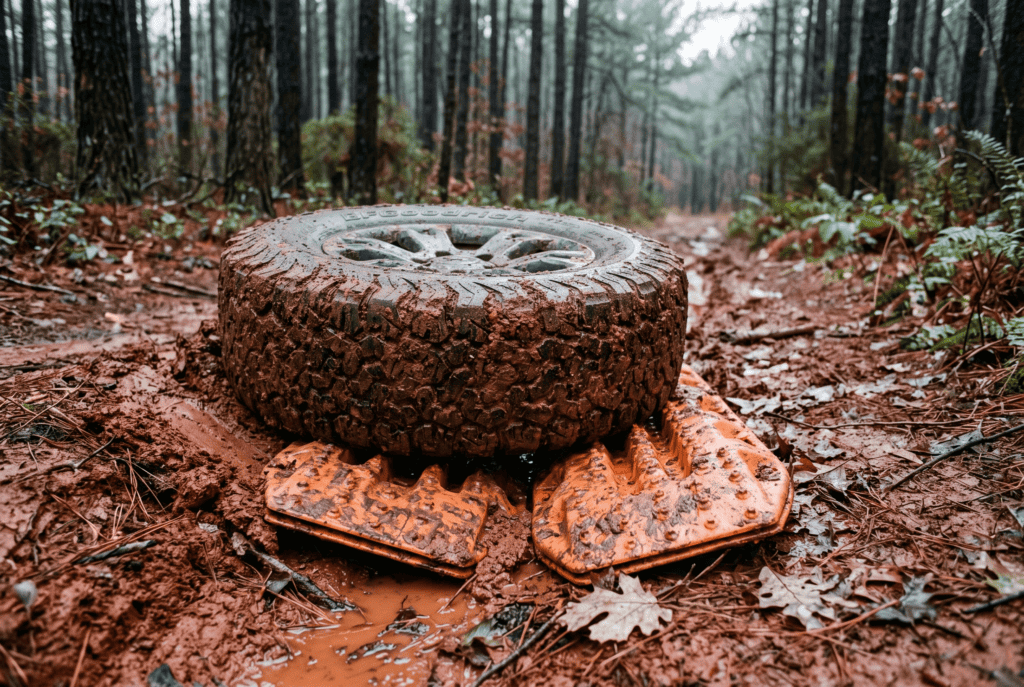
That last one isn’t optional, and it’s the mistake that kills people. A tow ball is built for vertical pulling, not for a stretch-and-snap kinetic load; under one it shears off and becomes a projectile. Use a dedicated receiver shackle mount — a steel block with a rated shackle hole, about $25. Never using a tow ball as a recovery point is one of the first rules taught by essentially every 4×4 training school.
Two more that cost nothing: anyone within 1.5 times the rope length is in the danger zone, so move bystanders back at least 30 feet and behind cover, and drape a dampener or heavy jacket over the rope so it drops instead of whipping back if it fails.
And understand that a kinetic rope and a tow strap are different tools. Tow straps with hooks are for flat-ground towing of a disabled vehicle; kinetic ropes stretch to store and release energy to break a stuck vehicle free. Swapping one for the other is how equipment fails.
Step 6 — Air Down at the Trailhead, Air Up Before Pavement
Lowering tire pressure lengthens and widens the contact patch, which buys traction on loose surfaces and lets the tire wrap around rocks instead of skipping off them. It also transforms ride quality on washboard, which matters more than people admit at hour four.
Rough starting points for a half-ton or mid-size rig on all-terrains at 32–38 psi street pressure: graded forest roads and light dirt, 22–26 psi; rocky and technical, 15–20 psi; mud, 15–18 psi. Heavily loaded rigs should air down less aggressively — the extra weight pushes harder on the sidewall — and on fast graded gravel above about 45 mph, stay closer to street pressure, because there the problem is heat, not grip. Treat these as starting points, not specs, and adjust a couple of psi at a time.
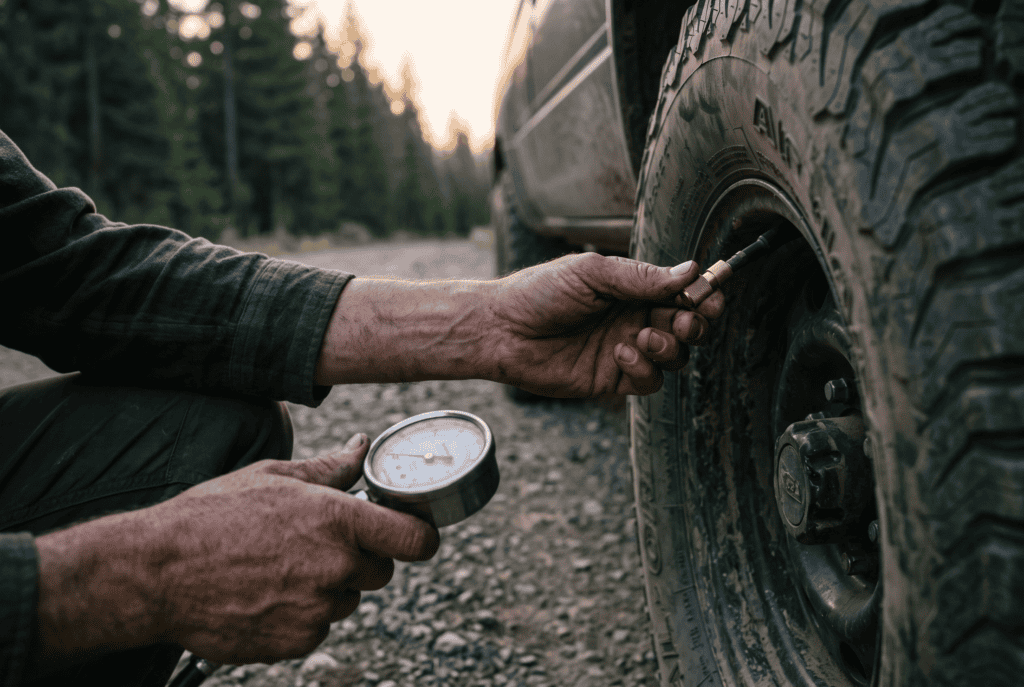
Two non-negotiables: carry a compressor, and air back up before you touch pavement. Highway speeds on low pressure build heat, wreck handling and roll beads off rims.
Key Considerations for Your First Trip
Four things that decide how a first trip goes, none of which show up in a gear list.
Go short and go close. Your first overnight should be somewhere you could walk out of. One night, one forest, roads you can bail off.
Assume no signal. Downloaded maps, a paper backup, and a plan the people at home already know. Coverage on forest roads isn’t partial — it’s absent, and it’s absent right when the road decisions get interesting. Worth setting your phone up to work offline before you go, and worth deciding who you’re actually trying to reach if things go wrong — your own group, or the outside world. Those are completely different answers, and buying the wrong one is common. A dedicated handheld GPS also doesn’t care whether your phone survives the day.
Travel with somebody the first few times. Two vehicles turns most stucks into a ten-minute delay. If you can’t, tell a specific person your route and your turnaround time.
Most days it’s nothing. The truthful version of what is overlanding is unremarkable: you’ll drive some pretty roads, eat out of a cooler and go home. The preparation isn’t for the average trip. It’s for the one in twenty where the road ends at a washout and it’s getting dark.
Taking It to the Next Level
Once you’ve run four or five overnights and know what genuinely irritates you — not what looks good in a build thread — upgrades start making sense. Rough order of return: better tires, a fridge, a sleeping platform, then a dual-battery or DC-to-DC setup to support the fridge. Recovery training before recovery hardware, always. A winch on a driver who’s never rigged one is a liability with a fairlead.
Alternatives to Overlanding
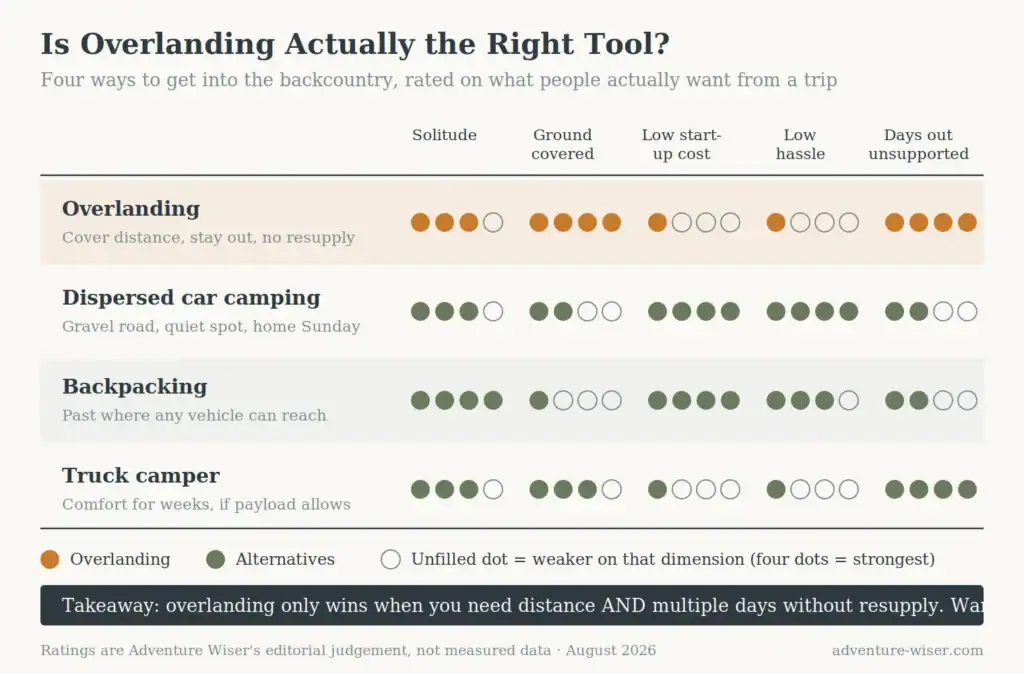
Being honest about this is the whole point of the site, so: overlanding is the wrong answer for plenty of people.
If what you want is quiet, dispersed car camping at the end of a maintained gravel road gets you 90% of the solitude with none of the payload math. If what you want is remote, backpacking gets you past where any vehicle can go, for an order of magnitude less money. If what you want is comfort in the backcountry for more than a weekend, a payload-honest truck camper beats a rooftop tent.
Overlanding earns its keep in one specific case: you want to cover ground, reach country too far to walk into and too rough to drive a car to, and stay out several days without resupply. That’s what is overlanding actually good for. If that’s not the description, save the money.
Frequently Asked Questions
What is overlanding in simple terms? Self-reliant vehicle travel on unpaved roads to remote places, where the journey is the point rather than a way of reaching a campsite. You carry your own water, shelter, power and recovery gear, and you’re typically out for multiple days.
Do I need a 4×4 to start overlanding? No. Plenty of forest and BLM roads are passable in a stock all-wheel-drive crossover, or a two-wheel-drive truck with decent tires and a careful driver. Ground clearance and tire quality matter far more than the badge on the tailgate. Start with roads rated for your vehicle class on the MVUM and work up.
What’s the difference between overlanding and off-roading? Off-roading treats the terrain as the objective — the harder the obstacle, the better the day. Overlanding treats terrain as something to get through en route to somewhere remote, and prioritizes reliability and self-sufficiency over capability. The vehicles look similar; the builds are not.
How much does it cost to get started? Under $600 covers a functional first kit if you already own a vehicle with reasonable tires: traction boards, shovel, kinetic rope and soft shackles, receiver shackle mount, deflator and gauge, a 12V compressor, water containers and a mapping subscription. Everything past that is comfort, not capability.
Where can I legally camp while overlanding? Dispersed camping is allowed across most national forest and BLM land, but the rules are local — stay limits, distance from water, and how far off the road you may drive all vary by forest and district. Check the MVUM and the district’s camping page for the specific area, and never assume one forest’s numbers apply to another.
So what is overlanding, if not camping with a nicer truck? Sometimes it honestly is. The dividing line is self-sufficiency and distance: if you could restock at a gas station in twenty minutes, you’re camping. If you’re carrying several days of water and the nearest pavement is an hour of low range away, you’re overlanding — regardless of what the truck cost.
Wrapping Up: What Is Overlanding, Once You Strip the Marketing Out?
Straight answer on my own experience, because this site doesn’t fake field time: I’ve done a lot of truck camping and dispersed camping in the Ouachitas, and I have not run a multi-day overland route. I live very close to a very popular overlanding destination. The forest-road driving, the map reading, the camping rules and the “this road doesn’t go where the app says it goes” part are all first-hand. A two-week self-supported route across a state is not, and I’m not going to write like it is. Where the specifics above come from published sources rather than my own trips, they’re linked.
Here’s what’s worth taking away. Everything in this post is a decision, not a purchase. What can my vehicle legally carry? Where am I legally allowed to drive? How do I get out if this road ends? Can I get myself unstuck? Answer those four and you’ve answered what is overlanding for yourself, in a stock truck, this year. Skip them and you’re a very well-equipped guy stuck in a rut with a dead phone.
So this weekend: pull the MVUM for the ranger district closest to you, pick one designated road, download the map for offline use, drive it and come back. That’s the trip. The gear conversation can wait until you’ve done that four or five times and formed your own opinion about what’s missing.
If you want the wider preparedness version of this thinking, the free 30-day plan works the same way — decisions first, purchases last.
Adventure Wiser tests gear in the field before it goes on the site. If it doesn’t hold up on the trail, it doesn’t make the cut.
Methodology and sourcing. Camping and motor-vehicle rules here come from current USDA Forest Service pages for the forests named, checked August 2026; they vary by forest and district and are subject to seasonal orders. Tire pressure and roof load figures are published ranges and manufacturer guidance, not measurements taken by Adventure Wiser, and are labeled as ranges on the diagrams. Prices were verified against vendor pages in August 2026. The diagrams in this post are free to republish with attribution and a link back to this page.