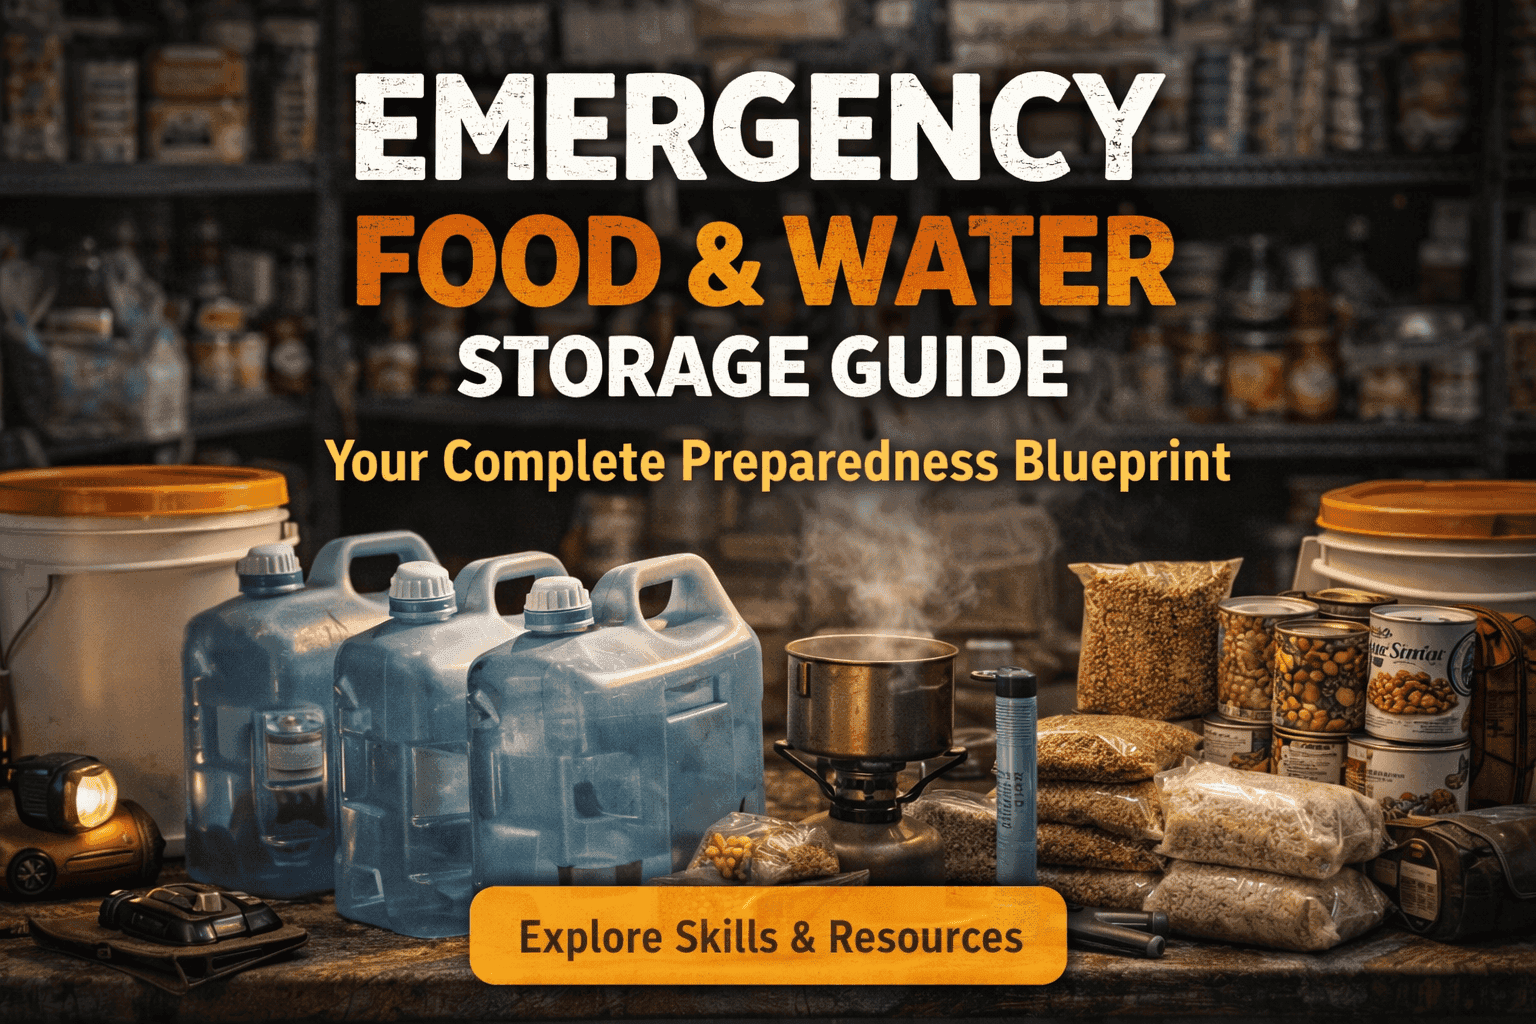
Emergency Food & Water Storage Guide: Your Complete Preparedness Blueprint
Here’s a sobering thought: the average American family is about 72 hours away from a genuine crisis. Not because we’re careless or lazy, but because most of us simply haven’t thought through what happens when the taps stop running and the grocery store shelves empty out. That’s why understanding Emergency Food & Water Storage is essential for every household.
I’ve been through enough emergencies, both personally and through my work with Adventure Wiser, to know that panic buying and last-minute scrambling rarely end well. The good news?Building a proper Emergency Food & Water Storage supply isn’t complicated, doesn’t require a bunker mentality, and won’t break the bank if you approach it systematically. If you’re thinking long-term, our guide to prepper garden planning explains how to build food resilience beyond store-bought supplies.
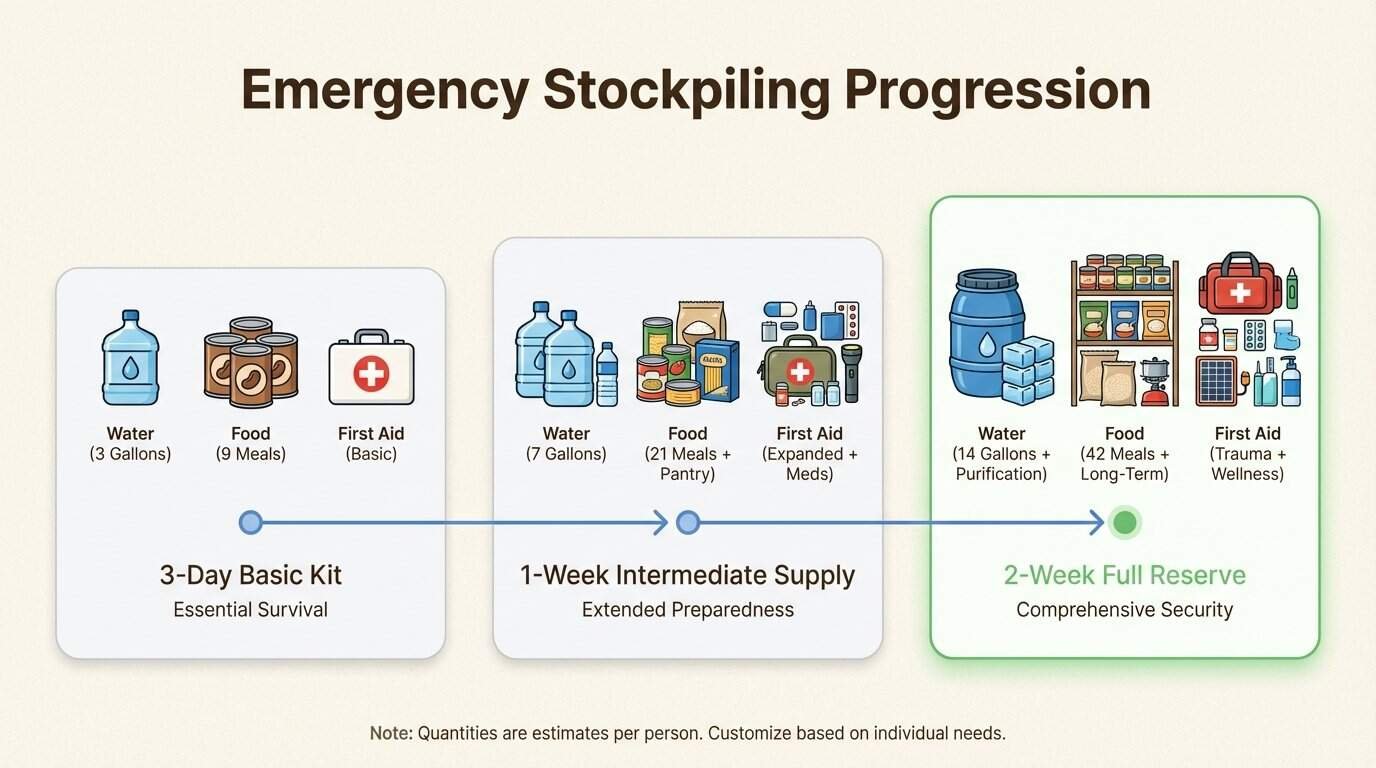
This guide cuts through the doomsday hype and gives you practical, FEMA-backed recommendations for building Emergency Food & Water Storage supplies that range from a basic 3-day kit to a more robust 2-week reserve. Let’s get your household prepared without the paranoia.
How Much Food and Water You Actually Need for Emergency Storage
The numbers floating around preparedness circles can be overwhelming. Some folks will tell you to stockpile six months of freeze-dried rations. Others insist on a year’s worth of wheat berries. Let’s start with what the CDC and FEMA actually recommend.
Water Requirements
The golden rule is one gallon per person per day. That covers drinking, basic food preparation, and minimal hygiene. A normally active person needs at least two quarts (half a gallon) just for drinking, but you need extra for cooking and sanitation.
Here’s what that looks like in practice:
| Family Size | 3-Day Supply | 2-Week Supply |
|---|---|---|
| 1 person | 3 gallons | 14 gallons |
| 2 people | 6 gallons | 28 gallons |
| Family of 4 | 12 gallons | 56 gallons |
| Family of 6 | 18 gallons | 84 gallons |
But these are minimums. You’ll need more if:
- You’re in a hot climate (heat can double water needs)
- Someone is pregnant or nursing
- Family members are ill
- You have pets (add extra for them too)
The Red Cross recommends a 3-day supply for evacuation scenarios and a 2-week supply for sheltering at home. I lean toward the 2-week target. Most disasters that disrupt water supplies, from hurricanes to ice storms to infrastructure failures, tend to last longer than 72 hours.
Regular checks on your Emergency Food & Water Storage can prevent future crises.
One critical rule from FEMA: never ration water when supplies run low. Drink what you need today and find more tomorrow. Dehydration impairs judgment and physical ability, making your situation worse.
Understanding the principles of Emergency Food & Water Storage is crucial for readiness.
Food Requirements
Food is more flexible than water. According to FEMA, healthy people can survive on half their usual food intake for extended periods, and without any food for many days. Children and pregnant women are the exceptions, they need regular nourishment.
Consider your family’s dietary restrictions when planning your Emergency Food & Water Storage.
For planning purposes, aim for 2,000 calories per person per day if maintaining normal activity. If you’re mostly sheltering in place with reduced activity, you can get by on less. The key is choosing foods that are calorie-dense and require minimal preparation.
Building Your Water Storage System
Emergency Food & Water Storage is not just about the basics but also ensuring variety in your supplies.
Water is your top priority in any emergency. You can survive weeks without food. Without water? Three days becomes critical.
Reliable water filtration is just as important as storage. Our guide to best water filters for preppers breaks down field-tested filtration systems.
Storage Container Options
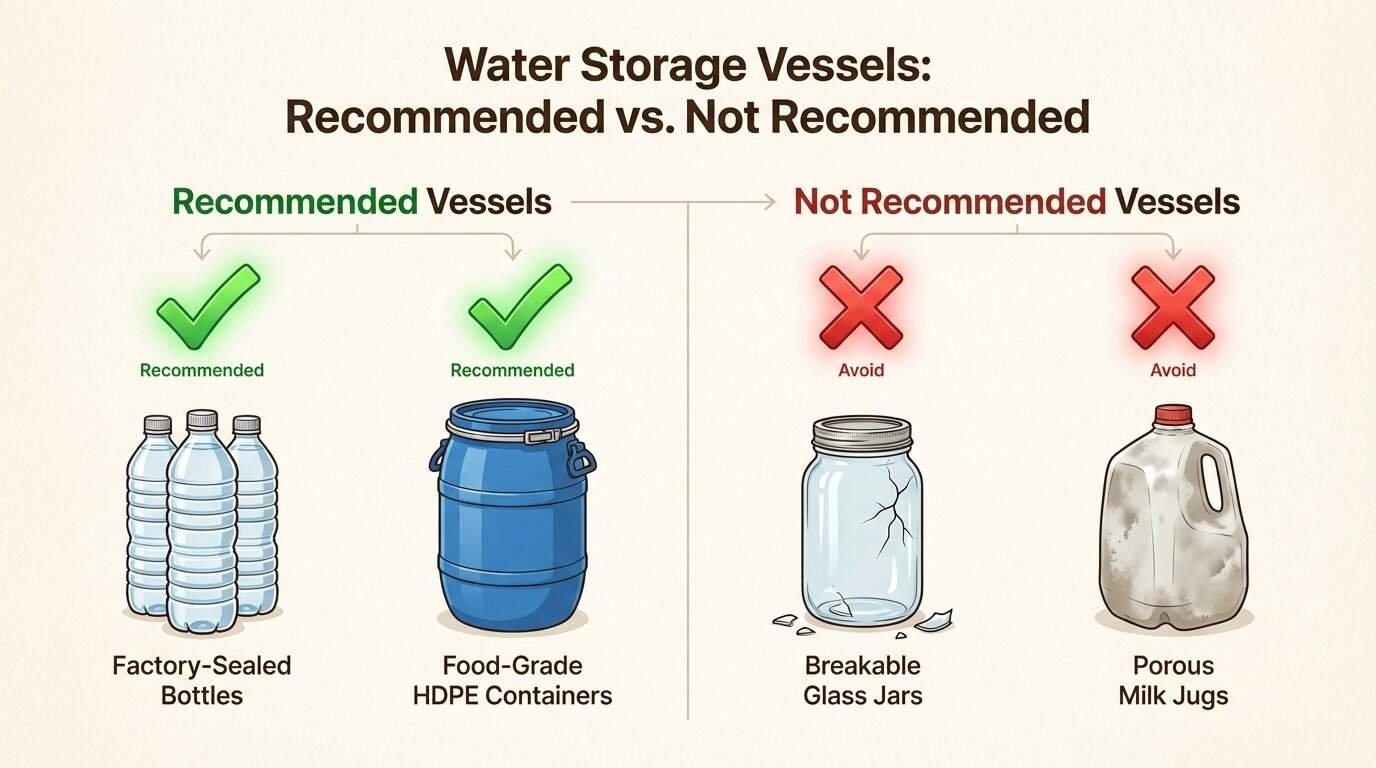
The safest, most reliable option is commercially bottled water. Keep it in its original sealed container and observe the expiration or “use by” date. It’s sterile, properly sealed, and portable.
If you’re storing tap water, use FDA-approved food-grade water storage containers. You can find these at surplus or camping supply stores. The container should have a tight-sealing top, be made of durable unbreakable materials (no glass), and ideally have a narrow neck for pouring.
What NOT to use:
- Milk jugs or juice containers (proteins and sugars can’t be fully removed, creating bacterial growth environments)
- Glass containers (heavy and breakable)
- Containers that held toxic chemicals
- Cardboard containers (leak easily)
If you’re using two-liter plastic soda bottles, the CDC recommends this cleaning process:
- Wash with dish soap and water, rinse completely
- Sanitize with a solution of 1 teaspoon unscented liquid household bleach (5-9% sodium hypochlorite) per quart of water
- Shake to touch all surfaces, wait 30 seconds, pour out
- Let air dry before filling
- Fill to the top with tap water
- Add two drops of bleach per gallon if your water isn’t already chlorinated
Proper Storage Conditions
Store water between 50°F and 70°F. Keep containers away from direct sunlight and toxic substances like gasoline, paint, or pesticides. Some plastic containers can absorb chemical odors that make the water undrinkable.
Label each container with the fill date. Replace stored tap water every six months. Commercially bottled water should be used by its expiration date.
Emergency Water Sources
If your stored supply runs out, your home has hidden water reserves:
- Water heater: 30-80 gallons of clean water. Turn off electricity or gas, close the intake valve, open the drain at the bottom, and turn on a hot water faucet to start the flow.
- Pipes: Let air in by turning on the highest faucet, then collect from the lowest faucet.
- Ice cubes: Use what’s in your freezer.
- Toilet tank: The reservoir tank (not the bowl) holds several gallons. Purify before drinking.
For outdoor sources like rainwater, streams, or lakes, always purify before drinking. More on that in a moment.
Creating Your Emergency Food Supply
Food storage doesn’t mean buying a pallet of MREs. In fact, the best approach is building around foods you already eat, rotated regularly into your normal meal planning.
Best Foods for Emergency Storage
Focus on non-perishable items that require minimal preparation:
Ready-to-eat canned goods:
- Canned meats (tuna, chicken, spam)
- Canned fruits and vegetables
- Canned soups and stews
- Canned beans
High-energy foods:
- Peanut butter (excellent protein and calorie density)
- Nuts and trail mix
- Granola bars and protein bars
- Crackers and melba toast
Staples and comfort items:
- Dried fruits
- Hard candy and chocolate
- Instant coffee and tea bags
- Sugar, salt, and pepper
- Vitamins
Comfort foods matter more than you might think. Stress affects appetite, and familiar foods can lift morale during difficult situations.
Foods to Avoid
Skip high-sodium items that increase thirst. If water is limited, you don’t want to be extra thirsty. Also avoid:
- Foods requiring extensive cooking (unless you have a reliable heat source)
- Items that need refrigeration without a backup power plan
- Bulky items with low calorie density
Storage Best Practices
The ideal storage location is cool, dry, and dark. Temperature between 40°F and 70°F is optimal. Heat causes food to spoil faster.
Protect your supplies from pests:
- Store boxed foods in tightly sealed plastic or metal containers
- Wrap crackers and cookies in plastic bags before storing in containers
- Transfer opened packages of sugar, dried fruits, and nuts to screw-top jars
Use the FIFO (First In, First Out) rotation system. Place new items at the back of your storage area and older items in front. Date everything with a permanent marker when you buy it.
Shelf Life Guidelines
According to FEMA guidelines, here’s how long common emergency foods last:
Use within 6 months:
- Powdered milk (boxed)
- Dried fruit
- Dry, crisp crackers
- Potatoes
Use within 1 year:
- Canned condensed meat and vegetable soups
- Canned fruits, juices, and vegetables
- Ready-to-eat cereals
- Peanut butter and jelly
- Hard candy and canned nuts
- Vitamins
May be stored indefinitely (in proper conditions):
- Wheat, dried corn, soybeans
- White rice, dry pasta
- Salt, baking powder
- Instant coffee, tea, cocoa
- Vegetable oils
- Powdered milk in nitrogen-packed cans
Inspect canned goods periodically for rust, leaks, bulging, or broken seals. Dents at seams or can ends can compromise the seal. When in doubt, throw it out.
Special Considerations for Your Emergency Food & Water Storage Guide
Every family has unique needs. A generic checklist won’t cover everyone.
Dietary Needs
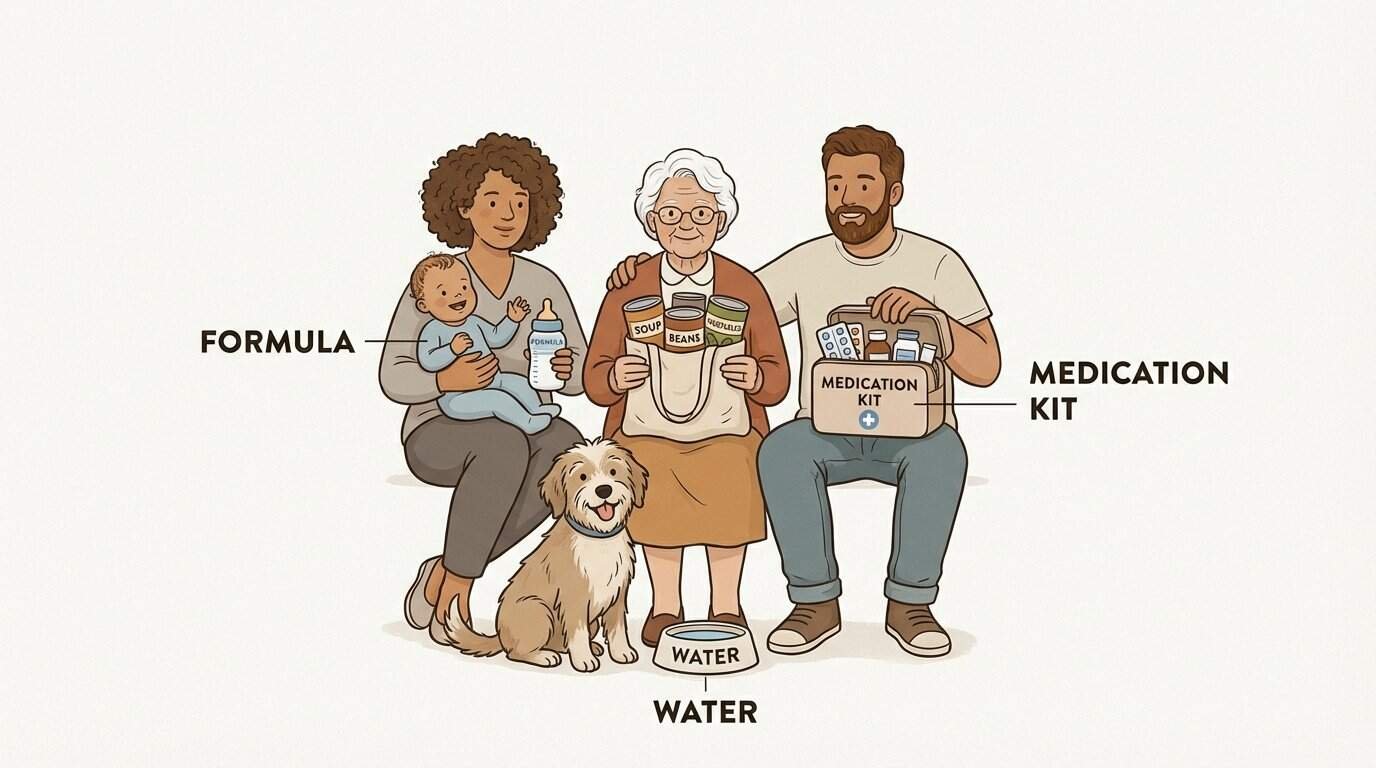
Infants and nursing mothers: Stock formula, baby food, diapers, and wipes. Nursing mothers may need liquid formula if stress affects their ability to nurse.
Special diets and allergies: Ensure you have appropriate foods for diabetics, those with celiac disease, or severe allergies. Emergency situations are not the time to experiment with new foods.
Elderly family members: Canned dietetic foods, juices, and soups may be easier for them to consume and digest.
Medical dietary restrictions: Anyone with specific medical dietary needs should have at least a week’s worth of appropriate foods set aside.
Pet Preparedness
Don’t forget your animals. Store at least a week’s worth of pet food and extra water. Pets typically need one ounce of water per pound of body weight daily, more in hot weather.
Cooking Without Power
If the power goes out, you have options:
For a deeper look at off-grid cooking gear, check out our Ultimate Camping Gear Guide: Field-Tested Essentials for 2026.
Outdoor cooking only:
- Charcoal grills
- Camp stoves
- Fire pits
Indoor warming (not cooking):
- Candle warmers
- Chafing dishes
- Fondue pots
Canned food can be eaten cold right out of the can. If you heat it in the can, remove the label first and open the can to prevent pressure buildup. Never use outdoor cooking devices inside, carbon monoxide kills.
When Disaster Strikes: Using Your Emergency Supplies
Having supplies is only half the battle. Knowing how to use them effectively matters just as much.
Power Outage Food Management
When the power goes out, follow this sequence:
- First: Use perishable food from the refrigerator. It stays cold for about 4 hours if unopened.
- Then: Use foods from the freezer. A full freezer maintains temperature for approximately 48 hours (24 hours if half full) when kept closed. Post a list of freezer contents on the door to minimize opening.
- Finally: Use non-perishable foods and staples.
Check food safety with a thermometer. If refrigerated food has been above 40°F for more than 4 hours (or 2 hours if temperatures are above 90°F), discard it. Frozen food with ice crystals remaining or that feels refrigerator-cold is safe to refreeze or cook.
Water Safety During Emergencies
If you need to use water of uncertain quality, purify it first. Contaminated water can contain microorganisms that cause dysentery, typhoid, and hepatitis.
Based on guidelines, your Emergency Food & Water Storage should focus on both nutritional value and shelf life.
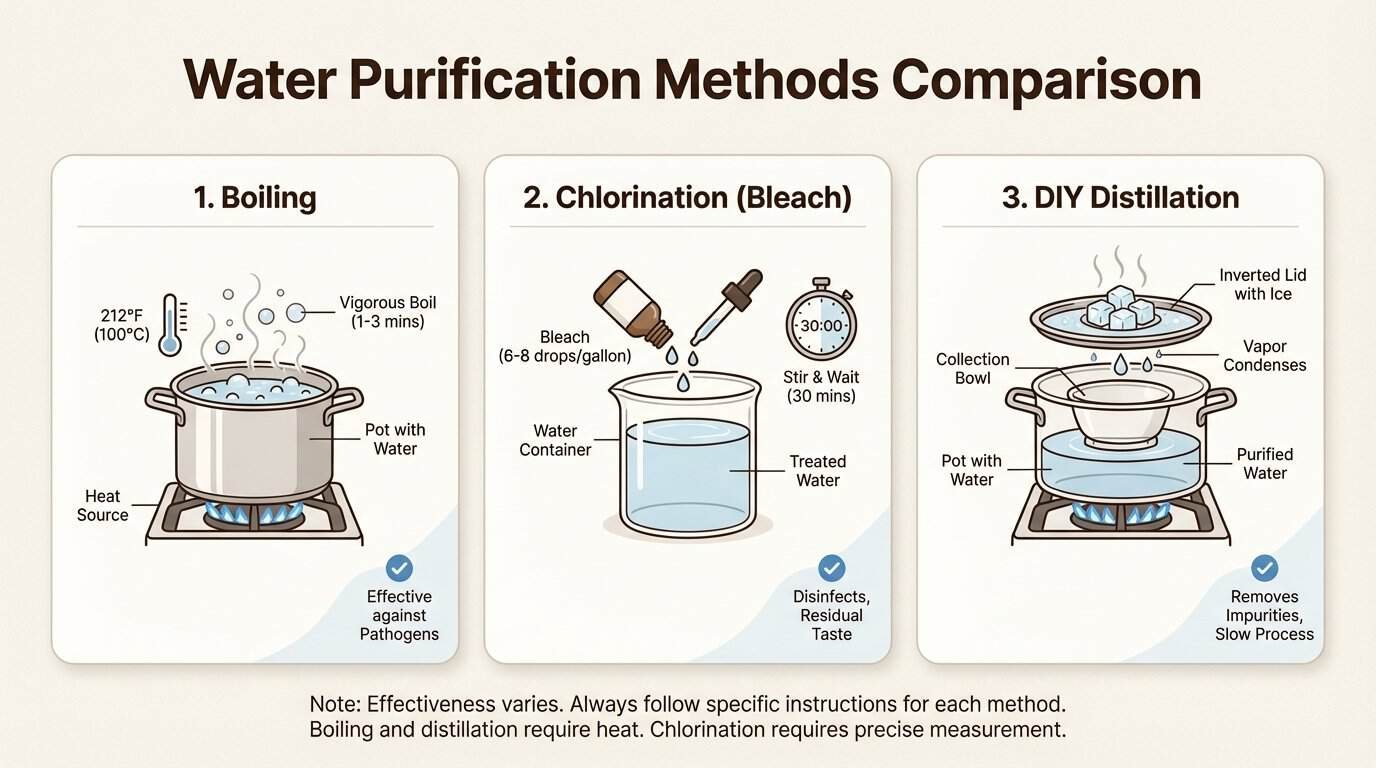
Boiling (safest method):
Bring water to a rolling boil for at least 1 minute (3 minutes at high altitudes). Let it cool before drinking. To improve taste, pour back and forth between clean containers to re-oxygenate.
Chlorination:
Use unscented household bleach containing 5.25-6% sodium hypochlorite. Add 16 drops (1/8 teaspoon) per gallon of water. Stir and let stand for 30 minutes. The water should have a slight bleach odor. If not, repeat the dosage and wait another 15 minutes.
Distillation:
For the most thorough purification, boil water and collect the condensed vapor. This removes microbes, heavy metals, salts, and most chemicals. Fill a pot halfway with water, tie a cup to the pot lid handle so it hangs right-side-up when the lid is upside-down, and boil for 20 minutes. The water that drips into the cup is distilled.
Food Safety After Flooding
Floodwater can contain sewage, chemicals, and bacteria. If canned goods have been submerged:
- Mark contents on the can with a permanent marker
- Remove paper labels (they harbor bacteria)
- Wash with strong soap and scrub brush, especially around lids and seams
- Soak in a solution of 2 tablespoons bleach per gallon of water for 15 minutes
- Air dry before opening
Throw out any home-canned foods, foods in glass jars, or anything with damaged packaging that was exposed to floodwater.
Maintenance and Rotation Schedule
Emergency supplies aren’t “set it and forget it.” They need regular attention.
Every 6 months:
- Replace stored tap water
- Check expiration dates on food
- Rotate items using FIFO
Annually:
- Review and update your kit for changing family needs
- Check storage containers for damage or leaks
- Verify manual can openers and other tools still work
- Update emergency contact information
- Test batteries in flashlights and radios
Set calendar reminders for these checks. Daylight saving time changes are an easy memory trigger, check your supplies when you change your clocks.
Your Emergency Supply Checklist
Here’s a quick-reference summary for building your kit:
Water:
- [ ] 1 gallon per person per day (minimum 3 days, ideally 2 weeks)
- [ ] Commercially bottled water preferred
- [ ] Food-grade containers for tap water storage
- [ ] Unscented household bleach (5-6% sodium hypochlorite) for purification
Food:
Having a variety in your Emergency Food & Water Storage will cater to different tastes and preferences.
- [ ] Canned meats, fruits, vegetables
- [ ] High-energy foods (peanut butter, nuts, granola bars)
- [ ] Comfort foods (candy, coffee, tea)
- [ ] Vitamins
- [ ] Manual can opener
- [ ] Disposable plates, cups, utensils
Storage:
- [ ] Cool, dry, dark location (40-70°F)
- [ ] Airtight containers for opened packages
- [ ] Permanent marker for dating items
- [ ] Inventory list posted near storage
Make sure your Emergency Food & Water Storage is accessible and easy to manage during emergencies.
Special Needs:
- [ ] Infant formula and baby food
- [ ] Pet food and water
- [ ] Prescription medications (7-day supply)
- [ ] Foods for special diets or allergies
Start Building Your Emergency Food & Water Storage Supply Today
You don’t need to build a complete 2-week supply this weekend. Start with a 3-day kit, then expand gradually. Each time you grocery shop, pick up a few extra cans or a case of water. Within a couple of months, you’ll have a solid foundation.
The key is starting. Most families never get around to it because the task feels overwhelming. But a basic 3-day supply is better than nothing, and you can build from there.
At Adventure Wiser, we focus on practical preparedness without the panic. This guide gives you the foundation for food and water security. For deeper dives into related topics like cooking without power, long-term food storage, or building complete emergency kits, subscribe to our AW Field Notes newsletter. We send practical skills and insights without the doomsday hype.
Remember: preparedness isn’t about expecting the worst. It’s about being ready so you don’t have to worry. Take the first step this week. Your future self will thank you.
Frequently Asked Questions
Q1: How do I get started with an emergency food & water storage guide if I’m on a tight budget?
A: Start small and build gradually. Each grocery trip, buy one or two extra canned goods and a gallon of water. Focus on foods you already eat so nothing goes to waste. A basic 3-day supply for a family of four costs roughly $50-75 if you shop sales and buy store brands.
Q2: Where should I store my emergency food & water storage supplies in a small apartment?
A: Use under-bed storage containers, the back of closets, or even decorative storage ottomans. Water can be stored in cleaned 2-liter soda bottles that fit in tight spaces. Focus on compact, calorie-dense foods like peanut butter and protein bars that take minimal room.
Outdoor cooking methods can be used if power is out to access your Emergency Food & Water Storage.
Q3: How often should I rotate items in my emergency food & water storage guide plan?
A: Check water every 6 months. Canned goods typically last 1-2 years, but check expiration dates. Use the FIFO (First In, First Out) method: put new items at the back, use older items first. Set phone reminders for checks.
Q4: Can I include fresh foods in my emergency food & water storage guide?
A: Fresh foods aren’t suitable for emergency storage due to spoilage. However, plan to use perishable items from your refrigerator and freezer first during an emergency (within 4 hours for fridge items, 48 hours for a full freezer). Then transition to your stored non-perishables.
Q5: What’s the most common mistake people make with emergency food & water storage?
A: Forgetting the manual can opener. Seriously. Also common: storing water in milk jugs (they leak and grow bacteria), not rotating supplies (food expires), and storing everything in one location (if that area is damaged or inaccessible, you lose everything). Split supplies between multiple locations.
Q6: How much should I adjust my emergency food & water storage guide for hot climates?
A: Double your water storage in hot climates or during summer months. Heat increases water needs significantly. Store supplies in the coolest part of your home, as heat accelerates food spoilage. Consider adding electrolyte powder to your supplies for hot-weather hydration.
Q7: Should I include cooking equipment in my emergency food & water storage plan?
A: Yes, but keep it simple. A manual can opener is essential. A small camp stove with fuel canisters (stored safely) lets you heat food and boil water. Avoid anything complex that requires electricity. Remember: most emergency foods can be eaten cold if necessary.