Mastering the Art of the Route: The Essential Guide to Tactical Pathfinding
Listen, if you’re still staring at a piece of paper like it’s a magic scroll that’s going to teleport you to safety, we need to have a talk. Most people think land navigation is about knowing where you are. It isn’t. If you’re at that point, you’ve already failed the first rule of not being a statistic. Real navigation—the kind I’ve practiced for over two decades in the woods and as a survivalist—is about choosing how you move through the terrain before your boots ever touch the dirt.
A map isn’t a treasure chart; it’s a quiet warning system. It tells me where I’ll bleed energy, where I’ll get funneled into a choke point, and where my mistakes will multiply under stress.
Today, we aren’t just “reading” maps like some hobbyist at a local park. We are planning routes like someone who actually expects friction. Welcome to the world of tactical pathfinding. This is where we stop following lines drawn by someone else and start making decisions that keep us alive and un-exhausted.
What Tactical Pathfinding Really Is
In my world, tactical pathfinding isn’t just a buzzword to make me sound cooler at the campfire (though it helps). It’s the calculated selection of a route based on reality, not optimism. When I look at a map, I’m not looking for the shortest distance between two points. I’m looking for the path that offers the best balance of energy expenditure, load management, and error recovery.
Tactical pathfinding means I select my route based on:
- Energy Expenditure: Can I actually make this climb without my heart exploding?
- Load Carried: A 50-pound ruck turns a “short shortcut” into a death march.
- Terrain Resistance: Is that white space on the map a clear field or a nightmare of laurel thickets?
- Visibility and Exposure: Can I see what’s coming, and more importantly, who can see me?
- Error Recovery Options: If I miss my turn, how screwed am I?
This is how hikers stay comfortable, but more importantly, this is how preppers stay unlost. In the survival community, we talk a lot about gear, but tactical pathfinding is the software that runs the hardware. The best route is rarely the shortest; it’s the one that forgives your inevitable human mistakes.
I’ve spent years watching people “bushwhack” their way into exhaustion because they thought they could beat the mountain. You can’t. The mountain has nothing but time. You have a limited supply of calories and daylight. Use them wisely.
The Path of Least Resistance: Contour Spacing
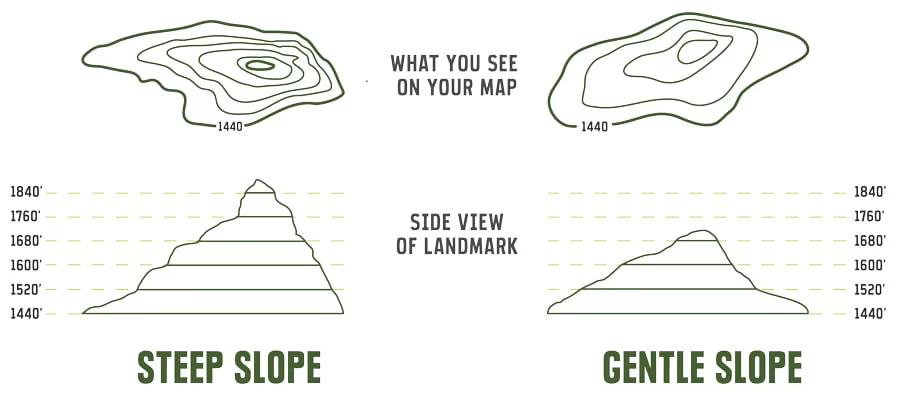
Let’s talk about contour lines. To the uninitiated, they look like a thumbprint. To me, they are effort in disguise. The space between those lines is exactly how much I’m going to suffer. Tactical pathfinding relies heavily on understanding that wide spacing equals mercy, while tight spacing equals a bad time.
When I’m carrying a heavy pack, I’m not just avoiding hills—I’m avoiding the “stacked” lines that indicate a vertical cliff. If I see contour lines stretching apart like they’re tired of each other, that’s where I want to be. That’s my “easy” button.
How to Plan for the Heavy Pack
If you’re bugging out or just on a long-haul trek, you need to avoid:
- Sustained Steep Grades: Your calves will thank me later.
- Repeated Elevation Loss and Regain: Nothing kills morale like climbing 500 feet just to drop 400 and have to climb it again.
- Micro-Climbs: Those tiny little bumps that don’t look like much on a 1:24,000 scale map but feel like Everest when you’re tired.
My rule for tactical pathfinding is simple: trace your route where the terrain is gentlest. I will gladly walk an extra mile on a flat contour than a half-mile straight up a ridge. Why? Because exhaustion kills judgment long before the terrain does. When I’m tired, I make stupid decisions. And in the woods, “stupid” is usually expensive.
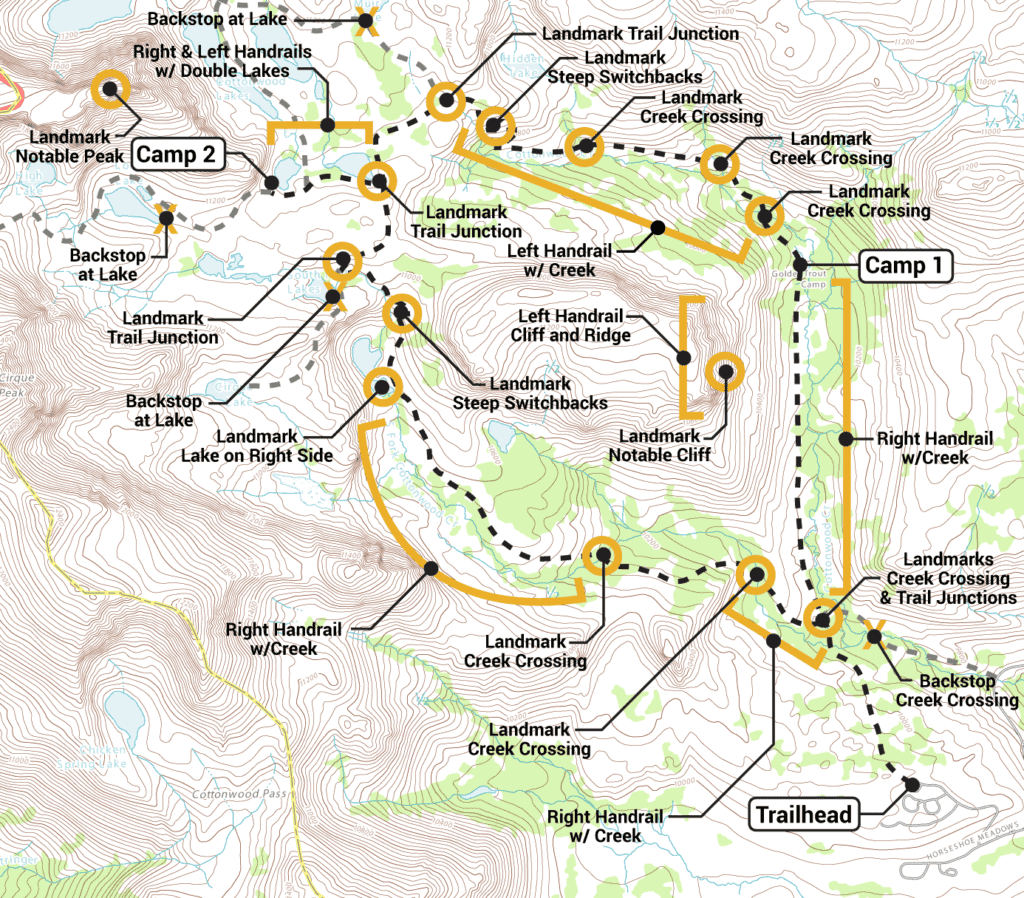
Handrails and Catch Features: Lazy Smart Navigation
I love being “lazy smart.” It’s a core doctrine here. If I can navigate without staring at my compass like it owes me money, I’m winning. This is where tactical pathfinding becomes almost automatic.
Using Handrails
A handrail is any linear feature that keeps me oriented without needing to check a bearing every thirty seconds. If I can walk parallel to it, it’s a handrail.
- Streams: Great, as long as you aren’t in a flood zone.
- Ridges: Excellent visibility, though you’re a silhouette to anyone below.
- Roads and Powerlines: Perfect for speed, but terrible for staying “low profile.”
- Fence lines: The ultimate man-made handrail.
By using these features, I free up my brain to scan for threats or resources instead of counting paces.
Catch Features: Your Safety Net
A catch feature is what stops me from going too far into the abyss. It’s the terrain saying, “Hey, idiot, you’ve gone far enough.” If I’m heading North toward a specific valley, and there’s a massive East-West highway two miles past my target, that highway is my catch feature. If I hit asphalt, I know I’ve overshot.
In a prepper mindset, tactical pathfinding demands that I never rely on a single precision point. I always want a “backstop.” If your navigation plan requires perfection, it’s already broken. I’ve seen enough “expert” trackers get turned around in the fog to know that a solid catch feature is worth more than the fanciest GPS on the market.
For more on high-level navigation tools, check out Section Hiker or the deep-dive tutorials over at Natural Navigator. These guys understand the “why” behind the “where.”
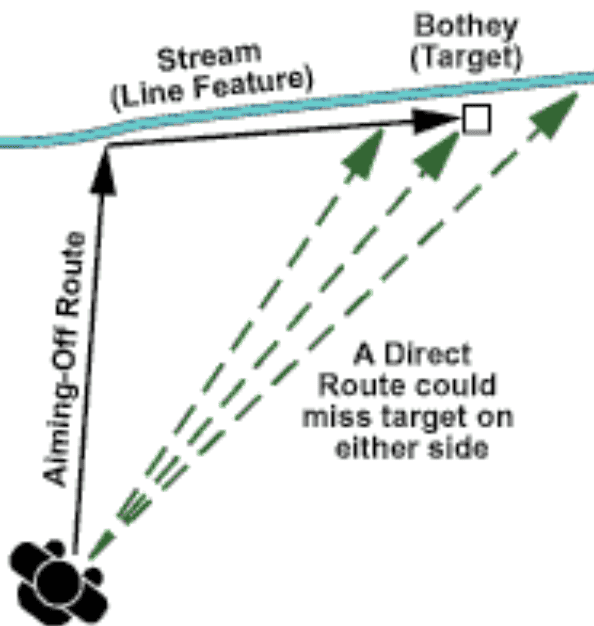
Aiming Off: The Intentional Miss
This is the skill that sounds absolutely wrong to beginners. Why would I intentionally miss my target? Because I’m a realist.
The concept of “Aiming Off” in tactical pathfinding is simple: instead of aiming directly for a tiny cabin on a five-mile-long road, I aim half a mile to the right of it. When I hit that road, I don’t have to wonder which way to turn. I know the cabin is to my left.
If I aim straight for it and miss (which I will, because wind, terrain, and my own crooked stride exist), I’ll hit the road and have a 50/50 chance of turning the wrong way. In the dark, in the rain, or when I’m freezing, a 50/50 chance is a gamble I’m not willing to take. Tactical pathfinding turns that uncertainty into a binary, “no-brainer” decision.
I’ve used this technique more times than I can count. Whether I’m trying to find a specific stream confluence or a hidden cache, aiming off has saved me hours of wandering around like a lost tourist. Remember: confusion burns more calories than distance. Walk the extra half-mile; it’s cheaper than the mental breakdown of being lost at 2:00 AM.
The Tactical Pathfinding Checklist
Before I move, I ask myself these four questions. If I can’t answer them, I don’t move. Period.
- Where is the lowest resistance terrain? (Find the gaps in the contour lines).
- What handrail can I lean on? (Find the line that leads the way).
- What catch feature saves me if I overshoot? (Find my backstop).
- Where should I aim off to remove doubt? (Plan the intentional miss).
If my map answers those questions, I’m not just navigating. I’m executing a plan. That is the essence of tactical pathfinding.
When you’re out there, whether you’re practicing for a “SHTF” scenario or just trying to get to a remote fishing spot, use these principles. Stop letting the terrain dictate your day. You be the boss. For more advanced terrain analysis, I often look at resources like USGS Topo Maps or the community forums at Survivalist Boards and BushcraftUSA.
Why This Skill Changes Everything
Tactical pathfinding isn’t flashy. It doesn’t involve tactical “operator” gear or expensive gadgets. It’s calm. It’s predictable. Honestly? It’s boring in the best way possible. It turns panic into a process and turns the terrain into your ally instead of your enemy.
A compass tells you where North is. Tactical pathfinding tells you how to survive getting there. I’ve been doing this for over 20 years, and I can tell you that the guys who survive aren’t the ones with the most gear; they’re the ones who know how to read the land and make it work for them.
So, put down the GPS for a minute. Pick up a paper map. Look at those contour lines and start thinking. Are you going to climb that ridge, or are you going to use tactical pathfinding to find the draw that leads you right around it? The choice is yours, but I know which one I’m picking.
FAQ: Tactical Pathfinding & Navigation
Q: Do I really need to use “Tactical Pathfinding” if I have a GPS? A: Yes, unless you’ve figured out how to make batteries last forever and satellites never glitch. GPS tells you where you are; it doesn’t tell you the “best” way to get where you’re going. Tactical pathfinding is the strategy; GPS is just a tool.
Q: Is “Aiming Off” really faster? A: In terms of total time spent “being at your destination,” yes. It eliminates the “search phase” when you hit your linear feature. In tactical pathfinding, we value certainty over theoretical shortcuts.
Q: How do I identify a “Draw” vs. a “Spur”? A: Look at the “V” or “U” shape of the contour lines. If the point of the “V” points toward higher ground, it’s a draw (a gully where water flows). If it points away from high ground, it’s a spur (a ridge). For tactical pathfinding, spurs are usually better for travel, and draws are better for finding water.
Q: Can I use tactical pathfinding in urban environments? A: Absolutely. Instead of ridges and streams, you use alleys, buildings, and major boulevards as your handrails and catch features. The logic of tactical pathfinding remains the same: minimize exposure and maximize predictability.
Q: What’s the most common mistake in tactical pathfinding? A: Over-optimism. People assume they can maintain a 3mph pace through thick brush or up steep inclines. Always factor in a “misery tax” when planning your route.