
Pace Counting for Land Navigation: Stop Getting Lost When GPS Fails
When Your Brain Plays Tricks on You: The Distance Deception
You know that sinking feeling during a hike when you’re huffing along, convinced you’ve conquered at least a mile of trail, only to sneak a peek at your phone and realize you’ve barely scratched 800 yards? Ouch. Your brain, that eternal optimist, has pulled a fast one again—stretching time and shrinking distance like some cosmic practical joke. It happens to the best of us: fatigue creeps in, the scenery blurs, and suddenly every step feels like progress… until reality checks in.
I vividly remember one ego-bruising escapade on what was supposed to be a straightforward 2-mile loop in the backwoods. Feeling like a trail-blazing champ, I patted myself on the back for my “impressive” pace—only to fire up my GPS app later and discover I’d meandered in lazy circles for a whopping 5 miles. Turns out, technology isn’t immune to tricks either: batteries drain in the cold, signals vanish under dense canopy, or glitches turn your route into a pretzel. That day taught me a hard lesson—our internal “distance calculator” is about as reliable as a chocolate teapot, and even gadgets have their off days.
This is where pace counting swoops in like a trusty sidekick from the analog era. Predating smartphones by centuries, this method has been the backbone of navigation for explorers, soldiers, and survivalists alike. It’s deceptively simple: using your steps as a built-in measuring tool to track distance accurately.
No apps crashing, no low-battery warnings—just pure, self-reliant skill. Once mastered, it transforms guesswork into precision, whether you’re traversing open fields, dense forests, or urban grids during a blackout. Let’s dive deeper into how it works, why it’s essential, and how to make it your go-to nav hack.
What Pace Counting Really Is: Your Built-In Odometer
At its heart, pace counting is like turning your body into a human tape measure. You count your strides to estimate distance traveled, relying on nothing more than your feet and focus. It’s a cornerstone of “dead reckoning”—navigating without external aids by calculating position from speed, time, and direction.
Historically, this isn’t some niche prepper trick; it’s battle-tested. Lewis and Clark paced their way across uncharted American wilderness in the 1800s, mapping rivers and mountains without a single satellite. Modern military units still drill it relentlessly, knowing GPS can be jammed, spoofed, or simply fail in hostile environments. For everyday adventurers, it’s invaluable during power outages, remote hikes, or when your phone decides to play dead.
The real magic? Its utter simplicity. No electricity, no data plans—just you calibrating your unique stride. It’s empowering: In a world obsessed with apps, pace counting reconnects you to the terrain, fostering a deeper awareness of your surroundings. Plus, it’s adaptable to any scenario, from casual strolls to high-stakes bug-outs.
The Simple Math Behind It: No PhD Required
Fear not, math skeptics—this is straightforward stuff, more like grade-school addition than advanced calculus. Because that’s exactly what we all want to learn here is calculus from a prepper! We’ll break it down without the jargon.
- Defining a Pace: A single “pace” equals two steps—one left footfall followed by a right (or vice versa). This halves your counting load, making it easier to maintain rhythm without mental overload. Pro tip: Always count on the same foot (e.g., every left strike) to avoid confusion mid-stride.
- Baseline Averages: On flat, even ground, most adults log 65–75 paces per 100 meters (about 328 feet). This equates to roughly 2–3 feet per step, but variables like height, weight, and fitness tweak it. Taller individuals (6’+) might hit 60 paces; shorter folks (under 5’6″) could need 80+. Gender plays a minor role too—men often have slightly longer strides due to biomechanics.
- Scaling for Real Distances:
- 650–750 paces ≈ 1 kilometer (0.62 miles)—ideal for metric topo maps.
- 1,600–1,800 paces ≈ 1 mile (1.6 km)—handy for imperial measurements.
- Quick conversions: For 500 meters? Half your 1km count (325–375 paces). Half a mile? Around 800–900 paces.
To personalize: Your pace is as unique as your gait. Factors like age (older folks shorten strides) or terrain (more on that soon) mean one-size-fits-all won’t cut it. The goal? Calibrate once, then multiply effortlessly. It’s math that moves with you—literally.
Getting Started: Finding and Fine-Tuning Your Baseline
Calibration is king—without it, you’re just guessing with extra steps. Here’s a foolproof setup process to establish your foundation.
- Locate a Measured Stretch: Aim for 100 meters of flat ground. A football field (end zone to end zone is roughly 100 yards—close enough for starters), running track, or measured neighborhood path works. If you’re precise, use a tape measure or wheel; apps like Google Maps can verify distances too.
- Walk and Count: Stroll at your natural hiking pace—not sprinting like you’re evading zombies, but comfortably as if on a real trek. Count every hit of your chosen foot (e.g., left). Time yourself if you want speed insights (e.g., 4 km/h average for moderate hikes).
- Repeat and Average: Do 3–5 runs to smooth out variables like wind or distractions. Average the counts—say, 66, 68, 70 → 68 paces per 100m.
- Footwear Test: Repeat in different shoes. Trail runners might yield 65 paces; bulky boots could bump it to 72 due to added weight and stiffness. Note: Wet conditions or fatigue later in the day can add 5–10 paces—practice accordingly.
Example: With a 68-pace baseline, a 2km route becomes 1,360 paces (68 × 20). It’s plug-and-play math that builds confidence fast.
Dealing with Real-World Conditions: Terrain, Fatigue, and Beyond
Mother Nature rarely serves up perfect paths, so adapt or get lost. Terrain tweaks your stride dramatically—here’s how to handle it.
- Uphill Challenges: Gravity fights back, shortening steps. Add 10–20% more paces (e.g., flat 68 → 75–82). Test on moderate inclines; steep grades might double that adjustment.
- Downhill Dynamics: Longer, looser strides mean fewer paces (60–65 per 100m). But control is key—rushing leads to slips. Practice controlled descents to nail consistency.
- Rough and Ready: In brush, mud, sand, or snow, strides shrink for stability, inflating counts by 20–50% (68 → 82–102). Roots and rocks force mincing steps; deep snow feels like wading through molasses.
- Other Influencers: Heavy packs (20+ lbs) compress strides by 10–15%; group hikes might force you to match paces, skewing yours. Weather? Rain slicks surfaces (+5–10 paces); heat saps energy (+ variable fatigue).
Solution: Build a personalized cheat sheet. Use a table like this for quick reference:
| Terrain Type | Paces per 100m | Adjustment Notes |
|---|---|---|
| Flat Ground | 68 | Baseline; ideal for paths |
| Uphill (Moderate) | 78 | Shorter strides; add 15% |
| Downhill | 62 | Longer strides; subtract 10% |
| Thick Brush/Mud | 90 | Careful footing; add 30% |
| Snow/Sand | 95 | High resistance; add 40% |
Log these in a waterproof journal. Recalibrate seasonally or after fitness changes—it’s your evolving nav toolkit.
The Simple Tool That Makes It All Work: Ranger Beads Explained
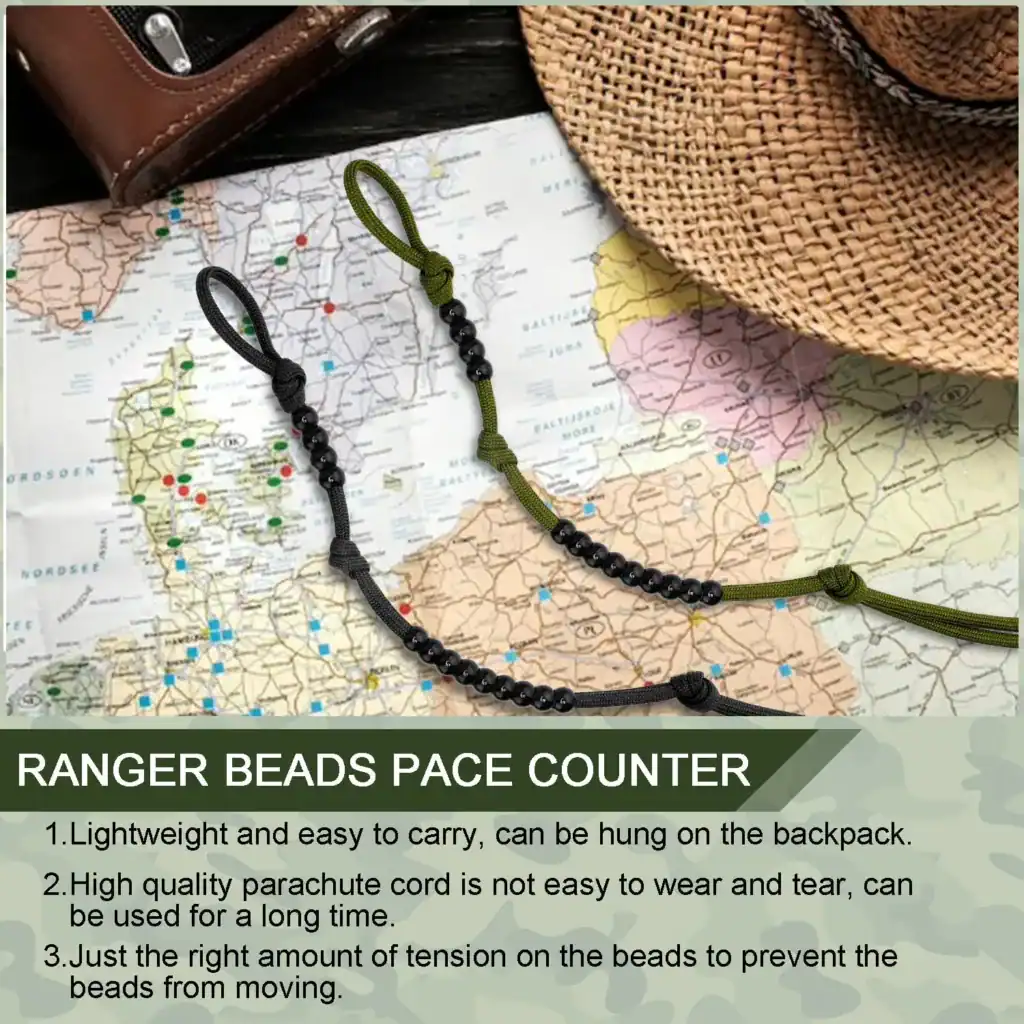
Mental math for 2,000+ paces? No thanks—that’s where errors sneak in. Ranger beads (aka pace counters) are your tactile savior: A low-tech abacus for the trail. One of the clearest breakdowns I’ve seen on using ranger beads comes from Dirty Civilian — it’s worth checking out if you want a no-nonsense visual guide.”
- DIY or Buy: Craft one with paracord and 13 plastic beads (9 lower for 100m increments, 4 upper for km). Total time: 10 minutes. Store-bought versions cost $5–10, often with glow features.
- Operation Basics:
- Start fresh: All beads up.
- Hit your 100m pace count? Slide one lower bead down.
- After 9 (900m), reset lowers and slide one upper (1km).
- Max: 5km before full reset.
- Why It Rocks: Hands-free operation—flick beads without breaking stride. Frees your mind for scanning terrain or chatting. Customizable: Bead for 200m if you prefer chunkier tracking.
Attach to your pack strap or wrist. In low light? Opt for reflective beads. It’s satisfyingly clicky, like popping bubble wrap for navigators.
When Things Don’t Go Perfectly: Embracing the Imperfections
Pace counting isn’t laser-precise—it’s a robust estimate with built-in forgiveness. Key realities:
- Fatigue’s Toll: After hours, strides shorten (68 → 75+ per 100m). Counter: Short breaks or mid-trek recalibrations.
- Load and Group Effects: Heavy gear compresses steps; mismatched group paces throw you off. Solo practice first, then adjust.
- Environmental Curves: Wind, altitude, or injuries add variability. Always factor 5–10% error margin.
- Mindset Tip: Perfectionism leads to frustration—aim for “close enough” and verify with landmarks (e.g., “That boulder at 400 paces? Spot on.”).
It’s okay to be off; the skill shines in redundancy, not rigidity.
Making It Even Better: Integrating with Other Nav Tools
Standalone pace counting is solid, but synergy elevates it:
- Compass Combo: Pace + bearing = pinpoint navigation. E.g., “270° for 800 paces to the ridge.”
- Map Mastery: Plot paces against features—cross a stream at 1km? Confirm and adjust.
- GPS as Trainer: On good days, compare paces to app data for fine-tuning. In failures, pace takes over.
- Advanced Twists: Pair with time (e.g., 3mph pace) for speed-distance calcs, or apps for initial calibration (then go analog).
This holistic approach turns you into a nav powerhouse.
Why I Learned to Love This “Old-School” Skill: A Personal Turning Point
Skeptical at first—I mean, why count steps when tech does it?—I dismissed pace counting as archaic. Then, on a frigid Ozarks winter hike, my phone’s battery iced over, plunging me into signal-less darkness. Disoriented and chilly, I fell back on half-remembered pacing drills, beading my way back to camp step by methodical step. It wasn’t flashy, but it worked—saving me from a hypothermic detour.
Today, it’s instinctive: I pace ridgelines, swamps, and city streets alike, feeling grounded and capable. It’s more than utility; it’s mindfulness—tuning into your body’s rhythm amid nature’s chaos. Tech enhances, but pace counting endures.
The Quiet Confidence of Self-Reliance: Why You Should Start Today
Mastering pace counting builds unshakeable outdoor assurance. When gadgets falter or signals fade, you’re still oriented, empowered by skills that can’t be hacked or drained. It’s not anti-tech—it’s smart redundancy, blending modern convenience with timeless wisdom.
For preppers, hikers, or casual explorers, it’s liberating: No more “lost” anxiety. Start small: Measure a local loop, practice daily walks. Gradually tackle varied terrain. The payoff? That deep-seated confidence of true self-reliance, one step at a time.
Your future self—safely arrived, map in hand—will high-five you.
Essential Gear to Get Started: Build Your Kit
- Ranger Beads: DIY with paracord and beads (<$5) or pre-made for convenience. Essential for long counts.
- Waterproof Notebook: Rite-in-the-Rain models ($10–15) for logging paces—rainproof and pocket-sized.
- Reliable Compass: Suunto MC-2 ($50) for mirror sighting or Cammenga 3H ($80) with tritium glow.
- Quality Boots: Consistent fit like Merrell Moab ($120) maintains stride reliability; test paces in them.
Invest wisely—these amplify your skills without overcomplicating.
Wrapping Up
At the end of the day, pace counting is one of those old-school land nav skills that looks simple on paper but pays dividends when you’re tired, lost, or staring at a dead GPS screen. It doesn’t take fancy gear or years of practice — just your own two feet, a little discipline, and maybe a set of ranger beads clicking away as you move.
Once you’ve locked in your personal pace, you’ve got a built-in odometer that works rain or shine, uphill or down, batteries or no batteries. It’s the kind of quiet skill that separates a lost rookie from a confident prepper. And when the trail ahead gets long, trust me — every step you count is one step closer to safety.
Ready to step up? Download our free Land Nav Cheat Sheet for pace tables and tips. Practice today—your adventures await!
Heads-Up, Fellow Preppers:
Some links in this post are sponsored or affiliate links. If you click and buy, I may earn a small commission—enough to restock my peanut butter and maybe add one more can of chili to the stash. I only recommend gear I trust, use, and would hide in a bug-out bag.
Frequently Asked Questions (FAQ)
Q: How many paces are in 100 meters?
A: Most adults average between 65–75 paces per 100 meters on flat ground, but your number is unique. That’s why calibrating your pace count is crucial.
Q: Do I count every step or every other step?
A: Count every time the same foot hits the ground (e.g., every left footfall). That’s one “pace.” Two steps equal one pace.
Q: Are ranger beads really necessary?
A: They’re not mandatory, but they make long-distance tracking far easier. Without them, you’ll lose count past a few hundred meters. They’re cheap, lightweight, and worth it.
Q: How accurate is pace counting compared to GPS?
A: On flat terrain with practice, you can be within 5% accuracy — good enough to hit your map checkpoints. Fatigue, terrain, and pack weight add error, but it’s still reliable when GPS fails.
Q: Can kids or shorter people pace count effectively?
A: Absolutely. Everyone has a stride length — it just means shorter folks may take more paces. As long as you calibrate your personal pace, it works for all ages and sizes.
Q: How often should I recalibrate my pace count?
A: Anytime you change gear, terrain, or season. Heavy packs, winter boots, or deep snow all affect stride. Logging different baselines in a waterproof notebook is a pro move.