
How To Use a Thermal Scope Without Missing Critical Details in the Dark
Most preppers invest thousands in thermal technology, flip it on during their first night watch, and promptly miss half of what’s happening around them. The heat signatures blur together, the settings confuse them, and they can’t tell a raccoon from a potential threat at 100 yards.
You bought premium gear to gain an advantage—not to squint at a glowing blob wondering if it’s friend, foe, or just your neighbor’s cat. Here’s the reality: thermal scopes give you god-tier night vision, but only if you actually know how to use a thermal scope properly.
This guide teaches you how to use a thermal scope the right way—so you can identify what you’re seeing, maintain proper scanning discipline, and leverage thermal technology like someone who knows what they’re doing. Learning how to use a thermal scope eliminates the guessing games in the dark.
What is a Thermal Scope?

Before learning how to use a thermal scope, you need to understand what you’re working with. A thermal scope is an optical device that detects infrared radiation (heat) emitted by objects and converts it into a visible image. Unlike traditional optics that need light, or night vision that amplifies existing light, thermal scopes create images based purely on temperature differences.
According to FLIR Systems, thermal imaging cameras detect radiation in the long-infrared range and translate it into visual data. Hot objects appear bright (or colored, depending on your palette setting), while cold objects appear dark.
Understanding how to use a thermal scope starts with knowing the technology. The device uses a microbolometer sensor that detects infrared energy and converts it into an electronic signal. Modern civilian thermal scopes operate in the LWIR (Long-Wave Infrared) spectrum at 8-14 microns, which excels at detecting ambient temperature differences—perfect for security, hunting, and surveillance applications. Outdoor Life’s thermal guide provides additional context on how this technology has evolved for civilian use.
Reasons You Need to Know How to Use a Thermal Scope
Owning thermal technology without knowing how to use a thermal scope properly is like carrying a loaded firearm you’ve never fired—dangerous, wasteful, and tactically useless when it matters most.
Why learning how to use a thermal scope matters:
- Nighttime threats are real: FBI crime statistics show a significant portion of property crimes occur after dark. If you can’t effectively identify what’s moving on your property at night, you’re always one step behind.
- Light discipline keeps you invisible: Every flashlight broadcast tells threats exactly where you are. Knowing how to use a thermal scope lets you observe without announcing your position—but only if you know how to use it without fumbling.
- Environmental independence: Thermal works in fog, light rain, smoke, and dust—conditions that blind other optics. Research shows thermal maintains effectiveness in degraded visual environments.
- Target identification is critical: Misidentifying targets in low light can have serious consequences. Proper training on how to use a thermal scope means knowing the difference between a coyote, a deer, and a person at 200+ yards—instantly.
- Search and rescue capability: NASAR recognizes thermal imaging as potentially life-saving technology in locating lost or injured persons.
- Wildlife management: Understanding how to use a thermal scope is essential for property owners dealing with predators or managing game populations, as confirmed by state wildlife agencies.
Learning proper thermal operation transforms an expensive paperweight into a force-multiplying tool that delivers on its promise.
Step-by-Step Instructions to Master How to Use a Thermal Scope
Here’s my field-tested process for learning how to use a thermal scope effectively—going from thermal novice to confident operator. This isn’t manufacturer manual regurgitation—it’s the practical sequence that builds competence fastest when you’re learning how to use a thermal scope.
The 5-Step Process for How to Use a Thermal Scope:
- Master Your Display Palettes
- Zero Your Optic Properly
- Learn Heat Signature Identification
- Develop Systematic Scanning Patterns
- Run Realistic Training Drills
Each step builds on the previous one. Skip steps and you’ll develop bad habits that cost you situational awareness when it matters.
Step 1: Master Your Display Palettes
When learning how to use a thermal scope, understanding palette settings is fundamental. Your thermal scope’s palette determines how heat information displays. Different palettes excel in different situations, and this is critical knowledge for anyone learning how to use a thermal scope effectively.
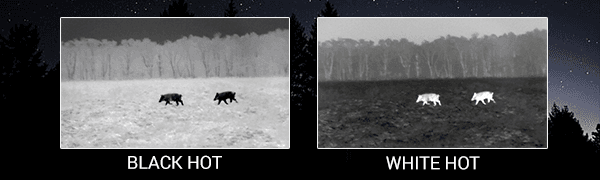
White Hot displays warmer objects as bright white, cooler objects as dark. This is your default for general security and scanning. The high contrast makes it easy to spot movement and identify living beings. American Hunter’s thermal review confirms this as the most versatile setting.
Black Hot inverts the display—heat shows as dark, cold as light. This excels when tracking movement across bright backgrounds or reducing eye fatigue during extended observation.
Red Hot highlights the warmest objects in red/orange while keeping cooler areas grayscale. This instantly draws your eye to the highest heat sources—ideal for rapid threat assessment.
Rainbow (or Iron Bow) displays temperature variations in multiple colors—showing subtle heat differences that monochrome palettes miss.
Tactical palette selection:
- Urban/suburban security: White Hot
- Rural/wilderness scanning: Red Hot
- Extended observation: Black Hot
- Detailed analysis: Rainbow
Pro tip: Cycle through palettes during your first few scans. What looks like clutter in White Hot often becomes clear in Red Hot. Train yourself to switch palettes based on what you’re seeing.
Step 2: Zero Your Optic Properly
A critical part of learning how to use a thermal scope for shooting is proper zeroing. Thermal scopes need zeroing just like traditional rifle scopes. The technology doesn’t magically make bullets go where you’re looking.
Zeroing process for how to use a thermal scope:
- Mount your thermal with quality rings torqued to specifications
- Set up a heated target (hand warmers, heated pads) at your primary engagement distance (50-100 yards)
- Fire a 3-round group aiming at center
- Adjust your reticle using turrets based on where the group centers
- Fire confirmation group to verify zero
- Document your zero with date, temperature, and ammunition
Critical considerations: Temperature affects zero. Some thermals shift point of impact as internal temperatures change. Zero in conditions similar to actual use. Re-verify after hard transport.
Use a laser bore sighter for initial alignment to save ammunition. Check out Long Range Shooting fundamentals that apply to thermal optics.
Step 3: Learn Heat Signature Identification
When mastering how to use a thermal scope, the most critical skill is correctly identifying what you’re seeing. Heat signatures can be deceptive, and proper identification is what separates competent operators from those who just point and hope.
Human signatures:
- Upright posture with narrow vertical profile (5-6 feet tall)
- Head hotspot distinctly separated from body
- Face and hands show brightest (exposed skin)
- Deliberate movement patterns
- Clothing reduces brightness but shape remains recognizable
According to Tactical Life’s comparison guide, understanding target signatures is essential for tactical applications.
Animal signatures:
Deer: Large oval body, distinctive leg pattern, horizontal orientation. Multiple deer show synchronized movement.
Hogs: Lower profile, stout body, prominent snout heat signature. Often in groups with erratic movement.
Coyotes: Dog-like profile with pointed snout, bushy tail. Purposeful, predatory movement patterns.
Raccoons: Compact, low-slung. Exploratory movement near structures.
Vehicle signatures:
- Engines create intense rectangular heat in front
- Exhaust systems show as bright lines underneath
- Tires heat during operation
- Recently parked vehicles retain engine heat 30+ minutes
Environmental false positives:
- Sun-heated rocks (remain hot hours after sunset)
- HVAC exhaust vents
- Warm water runoff
- Metal/glass reflective surfaces
The identification process: Detect → Assess size and shape → Observe movement → Consider context → Verify if critical.
Warning: Never make critical decisions based solely on thermal observation. Always confirm through secondary means when possible. NTOA emphasizes proper target identification protocols.
Step 4: Develop Systematic Scanning Patterns
Professional-level knowledge of how to use a thermal scope requires methodical scanning—not random sweeps. Random scanning misses threats. Professional security uses methodical patterns, and this discipline is essential when you learn how to use a thermal scope properly.
The overlapping sector sweep:
- Start from far left of observation area
- Scan horizontally in 30-40 degree sections
- Overlap sectors by 30% (backtrack slightly between sweeps)
- Work from near to far (close terrain, then mid-range, then distant)
- Scan horizon line first (movement shows against sky)
- Reverse and repeat
Layered security scan:
- Inner zone (0-50 yards): Scan every 30-60 seconds
- Middle zone (50-150 yards): Scan every 2-3 minutes
- Outer zone (150+ yards): Scan every 5-10 minutes
Critical mistakes to avoid:
- Scanning too fast (miss stationary signatures)
- Fixating on bright spots (ignore everything else)
- Forgetting vertical space (threats above/below)
- Inconsistent patterns (create gaps in coverage)
Window observation note: Standard glass blocks thermal radiation. You cannot scan through closed windows. Open slightly or use doorways. FLIR documentation confirms this limitation.
Training drill: Set up known heat sources around your property. Time how long it takes to detect all sources using systematic scanning. Work to reduce time while maintaining 100% detection rate.
Step 5: Run Realistic Training Drills
Understanding how to use a thermal scope theoretically means nothing without practical skill. Deliberate drills build the competence that matters during actual security situations or hunting scenarios. Field & Stream’s thermal hunting guide emphasizes that training separates successful operators from gear collectors.
Drill 1: Moving target detection
- Have a partner move through your property at various distances
- Practice detecting and tracking continuously for 5 minutes
- Call out position every 30 seconds
- Start with slow movement at 100 yards, progress to faster movement at 300+ yards
Drill 2: Signature identification speed
- Create observation course with known elements (people, pets, vehicles, heated objects)
- Scan and identify everything you detect
- Verify accuracy against known elements
- Track time and work toward <3 minutes with 95%+ accuracy
Drill 3: Range estimation
- Place heat sources at measured but unknown distances
- Estimate distance to each
- Verify with rangefinder
- Work toward <10% error across multiple targets
Drill 4: Environmental challenge
- Train during fog, rain, thermal crossover periods (dawn/dusk)
- Document how performance changes
- Develop realistic expectations for various conditions
Training frequency: 3-4 sessions weekly for first month, then weekly practice ongoing. You’ll perform in crisis exactly as you’ve trained.
Key Considerations For Successfully Learning How to Use a Thermal Scope
Battery management: When you learn how to use a thermal scope, battery management becomes critical. Cold weather cuts battery life 40-50%. Always carry spare batteries in warm pockets. Remove batteries during storage. Consider external battery packs for extended operations.
Maintenance: Never point at sun or intense heat sources—damages the sensor permanently. Use lens caps when not observing. Store in protective cases. Clean only with microfiber and approved solutions.
Legal considerations: Thermal scopes are legal to own in all 50 states. However, hunting regulations vary—check your state wildlife agency before hunting with thermal. Don’t surveil neighbors inappropriately. Follow ethical guidelines.
Environmental factors: Mastering how to use a thermal scope means understanding that performance changes dramatically with conditions. Temperature differential between target and background is critical. Thermal crossover at dawn/dusk creates minimum contrast. Rain, fog, and humidity reduce range. Adjust expectations and techniques based on conditions. Security Magazine regularly covers how environmental factors affect thermal surveillance systems.
What thermal CAN’T do: Doesn’t see through walls, glass, or water. Can’t identify faces or read text. Dense vegetation reduces effectiveness significantly. Understanding limitations prevents dangerous overconfidence when you’re learning how to use a thermal scope.
Alternatives to Learning How to Use a Weapon-Mounted Thermal Scope
Weapon-mounted thermal scopes aren’t the only way to leverage thermal imaging when figuring out how to use a thermal scope for your specific needs. Several alternatives suit different budgets and applications.
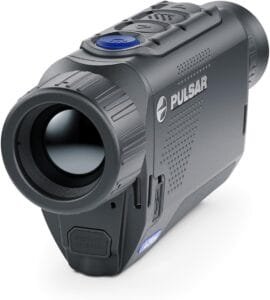
Handheld thermal monoculars: Pulsar Axion 2 or AGM Asp-Micro provide versatile thermal capability without weapon mounting. Learning how to use a thermal scope in handheld form is ideal for detection and multi-purpose use. Cost less than weapon-mounted units. OpticsPlanet’s thermal monocular guide provides detailed comparisons.
Clip-on thermal devices: AGM Explorator mounts forward of existing scopes, converting any optic to thermal. Use your familiar reticle and zero. Best for precision shooters wanting thermal flexibility.
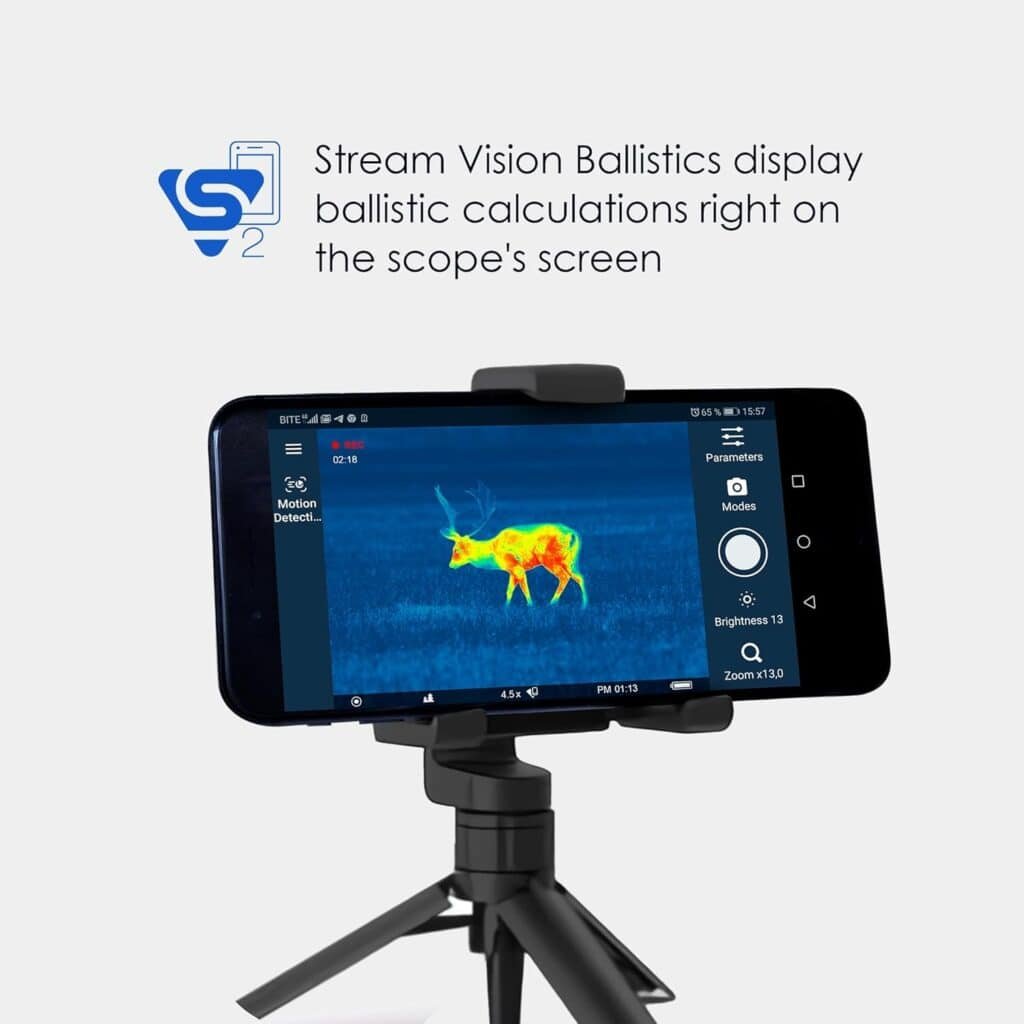
Fixed thermal cameras: FLIR security cameras provide 24/7 monitoring without active scanning. Continuous coverage with recorded footage. Higher cost but ideal for comprehensive property security.
Night vision: Traditional night vision devices offer better detail for identification at lower cost. Requires ambient light but excels for navigation and detailed observation. Consider combination approach: handheld thermal for detection, night vision for identification.
The best option depends on priorities, budget, and primary use. Many professionals eventually own multiple tools serving specific roles.
Wrapping Up and My Experience With How to Use a Thermal Scope
The first time I powered up a thermal scope, the tactical advantage was immediately obvious. A raccoon at 200 yards glowed like outlined fire. I could see deer bedded in grass invisible to naked eye.
But initial excitement gave way to frustration. I couldn’t consistently identify what I was seeing. My scanning was random and ineffective. I missed obvious targets while fixating on irrelevant heat sources. The device was capable—I wasn’t.
That gap drove me to develop systematic training for how to use a thermal scope properly. I ran hundreds of hours of drills, tested different techniques, and gradually built genuine skill with thermal imaging.
Here’s what I learned: thermal scopes multiply capability exponentially—but only when you invest in actually learning how to use a thermal scope. The technology isn’t magic. It’s a tool that rewards deliberate practice and punishes assumptions.
Every time I scan my property now, I’m using muscle memory from training. Palette selection is automatic. Scanning is systematic. Identification is confident and fast. The technology delivers because I developed competence in how to use a thermal scope properly.
Follow this framework, run the drills, develop the skills, and you’ll transform expensive thermal technology into genuine tactical advantage. The night is no longer a liability when you can see heat. Master how to use a thermal scope, and you’ll wonder how you ever managed without thermal capability.
Your thermal scope isn’t a magic wand. It’s a capability multiplier waiting for competence to unlock it. Now you have the framework to build that competence deliberately and effectively.
Heads-Up, Fellow Preppers:
Some links in this post are sponsored or affiliate links. If you click and buy, I may earn a small commission—enough to restock my peanut butter and maybe add one more can of chili to the stash. I only recommend gear I trust, use, and would hide in a bug-out bag.
Every purchase through these links helps keep Adventure Wiser running and allows me to continue testing and reviewing the best thermal scopes for preppers on the market. Your support means I can spend more time in the field and less time worrying about server costs.
Thank you for being part of the Adventure Wiser community.